
Buying every tool before a bathroom remodel can leave you with costly equipment you’ll use only once. A better starting point is the work itself: the tools needed for bathroom remodel projects depend on what you’re removing, repairing, and installing. Start by listing each task, then identify the tool that fits its material, location, and finish. That helps prevent avoidable mistakes, such as using an oversized tool in a tight space or damaging tile, plumbing, wiring, or surfaces you plan to keep.
A phase-by-phase checklist makes those choices clearer. This guide covers tools for preparation and removal, then matches common tool categories to plumbing, electrical, tile, and finish work. You’ll also learn how to weigh buying against renting equipment for a short-term task and how to prepare a safer, more organized work area.
Plan around your actual scope rather than a one-size-fits-all shopping list. For projects in Pahrump, Beatty, Goldfield, and Tonopah, local tool and equipment rentals can be part of planning for equipment needed only briefly.
Key Takeaways
- Match the tools needed for bathroom remodel work to your project scope, from a cosmetic refresh to changes involving tile, fixtures, plumbing, or electrical systems.
- Arrange your checklist in work order, so each tool category supports a specific task from preparation through cleanup.
- Compare buying, borrowing, and renting by how often you’ll use a tool, how much storage it needs, and how long the project will take.
- Set up a safer work area before starting, with task-appropriate eye, hearing, hand, and respiratory protection.
- Finalize your task list and materials before choosing which tools to rent or purchase; local tool rentals can be part of planning for a Pahrump-area remodel.
Tools Needed for a Bathroom Remodel: Start With the Scope
The right tool list starts with the work you plan to do, not with a standard kit or a full demolition checklist. A cosmetic refresh, such as painting or replacing cabinet hardware, calls for a different setup from removing tile, fitting a vanity, or changing plumbing. Existing surfaces matter too: painting over sound walls is different from repairing damaged drywall, and installing new flooring on a prepared surface is different from lifting old tile.
A project-specific tool checklist is a task-by-task list of the tools and protective equipment needed for the work you’ve actually planned. It helps you avoid buying equipment for tasks outside your scope and spot missing essentials before work begins. For a general overview of bathroom components that may shape your plan, see the Bathroom Wikipedia article.
Which bathroom remodel tasks are you taking on?
Write down the surfaces, fixtures, and materials you intend to change. Then group the work by phase: preparation, removal, installation, finishing, and cleanup. A refresh might need measuring and painting supplies. Replacing tile may call for tools to remove old material, prepare the substrate, make cuts, and apply grout. Replacing a fixture has different requirements depending on how it connects and what surrounds it.
Clearing the room, protecting surfaces, and measuring are often manageable DIY steps. Work that involves relocating plumbing, changing electrical layouts, or making unfamiliar connections may need qualified tradespeople. Define where your own work ends before choosing tools for the next task.
Build a checklist before buying or renting
Map every planned task to the tool that supports it. Measuring and layout call for accurate measuring tools; removal calls for tools suited to the material being taken out; installation calls for equipment matched to the new fixture or finish. Add protective equipment based on the task and the tool’s instructions. Consider eye, hearing, hand, or respiratory protection where appropriate.
Also note which tools you’ll use repeatedly and which are for one short phase. That distinction will help you compare ownership, borrowing, and rental choices later. For projects in Pahrump, Beatty, Goldfield, and Tonopah, local tool and equipment rentals can be part of that decision.
Before work starts, check that each tool fits the material, space, and task. In a bathroom’s tight corners, a tool that is difficult to control can damage nearby finishes. A short, specific checklist makes it easier to prepare carefully and keep the work area organized.
Bathroom Remodel Tools by Project Phase
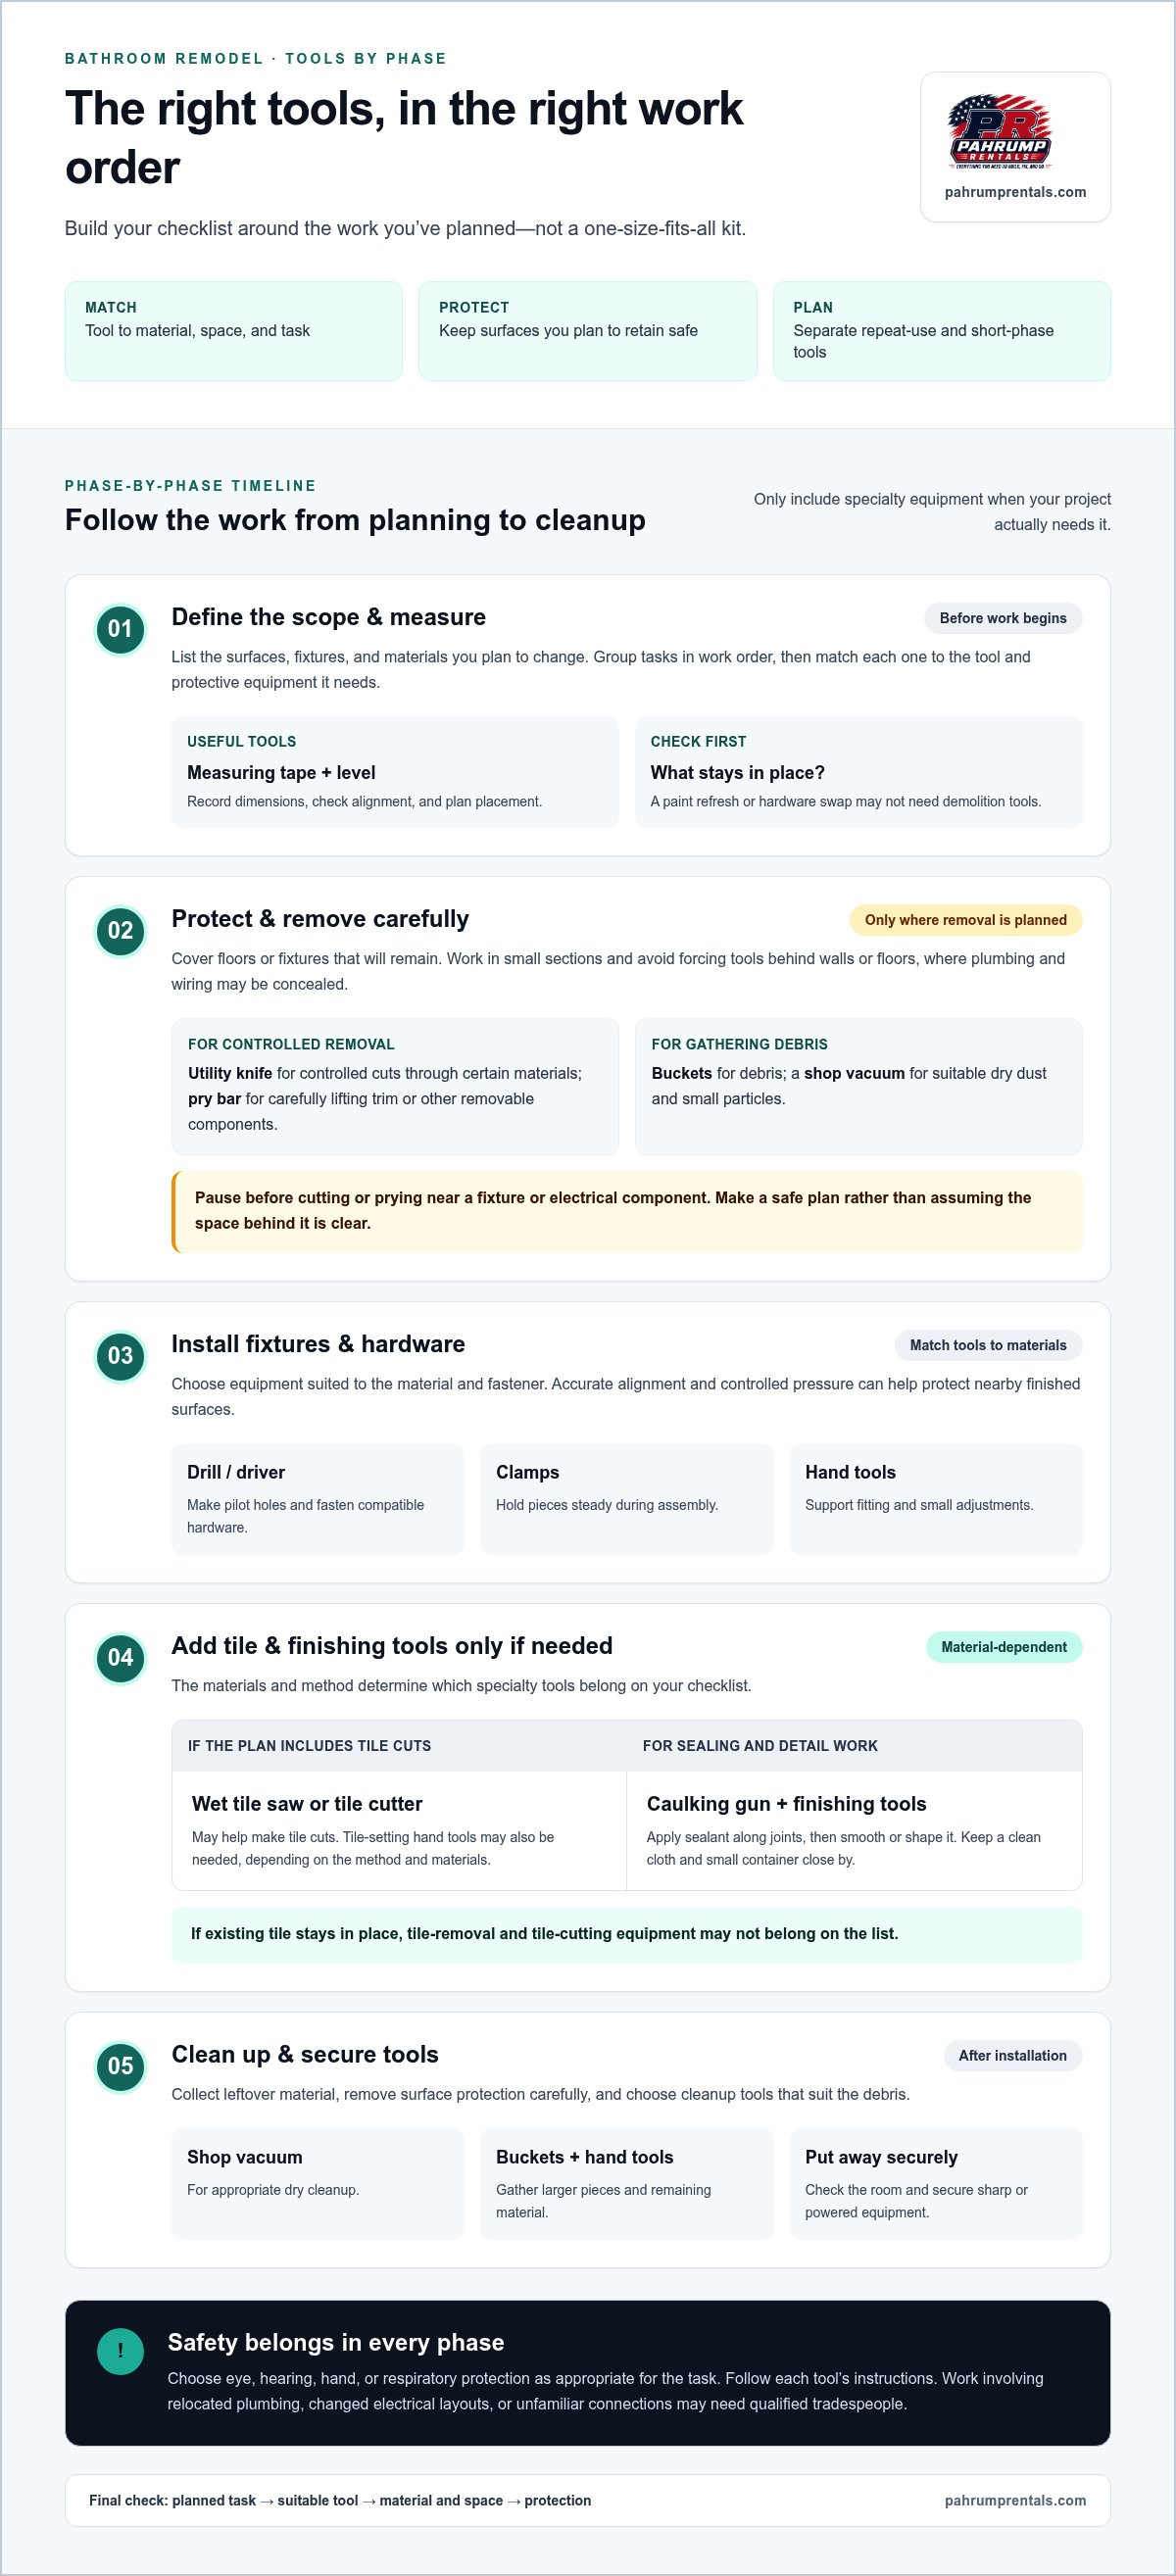
Organize your tool list in the order the work will happen. This keeps preparation equipment separate from installation tools and makes it easier to spot specialty items needed for only one task. The tools needed for bathroom remodel work depend on the surfaces and materials involved, so a project that keeps its existing floor won’t need tile-removal or tile-cutting equipment.
Preparation and careful removal
Begin with measuring and protection. A measuring tape and level help you record dimensions, check alignment, and plan the placement of new items. Use suitable surface protection to cover floors or fixtures that will remain. A utility knife can help with controlled cuts through certain materials, while a pry bar may assist with carefully lifting trim or other removable components.
Removal requires patience. Work in small sections and avoid forcing tools behind walls or floors where plumbing and wiring may be concealed. If the planned work involves opening a wall near a fixture or electrical component, pause before cutting or prying and make a safe plan. Don’t assume every remodel requires demolition; painting or replacing hardware may leave existing surfaces intact.
Keep buckets nearby for debris and a shop vacuum for suitable dry dust and small particles. Hand tools can help gather or separate material without relying on powered equipment for every step. Follow each tool’s instructions, and use protection appropriate to the task.
Installation, tile work, and finishing
For installation, drills and drivers can help make pilot holes and fasten compatible hardware. Clamps may hold pieces steady during assembly, while hand tools support fitting and small adjustments. Choose tools that suit the material and fastener. Controlled pressure and accurate alignment can help protect nearby finished surfaces.
The materials you choose determine which specialty tools your remodel needs. If the plan includes tile cuts, a wet tile saw or tile cutter may help make them. If tile stays in place, those tools may not belong on the checklist at all. Tile installation can also call for tile-setting hand tools, depending on the method and materials. Similarly, for projects that require re-skimming walls or applying waterproof backing coats, professional equipment suppliers such as PFT Wales provide dedicated plastering and rendering tools, whereas small patching jobs need only basic hand trowels.
For sealing and detail work, a caulking gun helps apply sealant along joints, and finishing tools can help smooth or shape it. Keep a clean cloth and a small container for cleanup close by, following the product instructions for the material being applied. Work carefully around edges and fixtures so excess material doesn’t spread onto surfaces that should remain clean.
Final cleanup
Once installation and finishing are complete, collect leftover material, remove surface protection carefully, and clean the work area with tools suited to the debris. A shop vacuum may help with appropriate dry cleanup; use hand tools and buckets to gather larger pieces. Check the room before putting tools away, and keep sharp or powered equipment secured. For projects in Pahrump, Beatty, Goldfield, and Tonopah, rental equipment can be considered for a short project phase.
Buy, Borrow, or Rent Bathroom Remodel Tools?
Not every tool needs to become part of your workshop. The best choice depends on how often you expect to use it, how long the remodel will take, and whether you have a suitable place to store and maintain it. Use the comparison below to sort each item on your checklist before spending time or money on equipment.
| Option | Repeat use | Storage and care | Project duration |
|---|---|---|---|
| Buy | Practical for tools you’ll use on future repairs or projects. | You’re responsible for storage, upkeep, and keeping tools in working order. | Useful when the tool is needed across multiple projects or over an extended period. |
| Borrow | Can make sense for a tool you need occasionally. | Requires arranging a loan and returning the tool in good condition. | Best suited to a short, clearly planned task and an agreed return time. |
| Rent | Can suit equipment needed for one project or an infrequent task. | Reduces the need to store equipment long-term, but requires planning around the rental period and equipment instructions. | Consider it when you can schedule the task and use the tool within the rental period. |
Which tools make sense to own?
For a tool you’re unsure about, estimate how often you’ll realistically use it after this project. A specialized item can take up valuable storage space while sitting unused. If you already own a suitable tool, make sure it’s in good condition and appropriate for the task before relying on it.
When renting specialty tools can help
Renting may be a sensible option for equipment used briefly or infrequently. For example, if your remodel includes tile cuts, a tile-cutting tool could be needed for that phase only. If the project doesn’t involve cutting tile, it likely doesn’t belong on your list. Pahrump Rentals & Hardware provides tool and industrial equipment rentals for local projects in Pahrump, Beatty, Goldfield, and Tonopah, giving you a local option to consider when planning for equipment you won’t need to store afterward.
Before choosing, note when the tool will be needed, how long the task is expected to take, and whether delays could extend that period. Compare renting with buying and borrowing for each item. The tools needed for bathroom remodel work are project-specific, so decide one item at a time rather than choosing a single approach for the whole job.
Bathroom Remodel Tool Safety and Setup Checklist
A safe setup is part of choosing the tools needed for bathroom remodel work. Tight spaces, sharp materials, dust, and existing plumbing or wiring call for deliberate preparation. Use this checklist before starting each phase, and adjust it to the task, tool, and materials involved. It helps protect people, nearby finishes, and the work area without assuming every remodel has the same risks.
- Clear the route and work area. Move rugs, storage, and other obstacles out of the path between the bathroom and the exit. Keep the route clear for carrying tools and removing debris.
- Protect surfaces that will stay. Cover nearby floors, fixtures, and finishes with protection suited to the work. Secure it so it won’t shift underfoot or get caught in a tool.
- Set up an orderly work zone. Place tools where they’re easy to reach but not in walkways. Separate usable materials from debris, and keep buckets or containers ready for waste. A tidy area makes it easier to notice misplaced tools and sharp scraps.
- Check every tool before use. Look for visible damage, loose parts, worn cords, or other issues. Use the tool only as its manufacturer’s instructions describe, and don’t improvise with a tool that isn’t suited to the task.
- Choose protective equipment for the task. Wear eye protection when flying particles or splashes are possible. Consider hearing protection for noisy work, gloves appropriate to the material and task, and respiratory protection when dust or airborne particles may be present. Follow the tool and protective-equipment instructions for proper use.
- Plan for dust and debris. Use cleanup methods suited to the material and tool. Keep debris contained rather than letting it spread to adjoining rooms, and don’t use a vacuum for material unless it’s designed for that purpose.
- Pause at concealed services or damage. Don’t cut, pry, drill, or remove material if you’re unsure what’s behind it. Stop if you encounter unfamiliar wiring, plumbing, or hidden damage. Electrical, plumbing, and structural work may require qualified professionals.
Before each task, read the tool’s operating instructions and review current safety guidance relevant to the work. Protective gear isn’t one-size-fits-all; the right choice depends on the hazard, the equipment, and the manufacturer’s directions. If the task changes or unexpected conditions appear, stop and reassess rather than continuing with an unsuitable setup.
Good preparation also means having the right equipment for the work without crowding the room with tools you don’t need. For projects in Pahrump, Beatty, Goldfield, and Tonopah, explore local tool rental options as part of planning equipment for a short-term task.
Plan Your Bathroom Remodel Tools and Local Rental Needs
A useful tool plan turns the remodel scope into a workable sequence. Before buying supplies or arranging equipment, confirm which tasks are included, what materials each task involves, and which work will be handled by you or a qualified trade professional. Then match tools to the tasks in the order they’ll happen. This helps prevent last-minute gaps and avoids preparing for work that isn’t part of the project.
Prepare a useful tool and materials list
Group your list by phase, such as preparation, removal, installation, finishing, and cleanup. For each task, record the materials and tools it needs, then mark each item as owned, borrowed, purchased, or rented. Include measuring tools and protective equipment, along with small supplies such as fasteners or surface coverings where relevant. Identify tools used briefly so you can plan around storage and avoid keeping specialty equipment you’re unlikely to use again.
Next, check the order of work. A tool needed for an early removal task should be ready before installation materials arrive, while a finishing tool can be scheduled for the final stage. Leave room for adjustments if the work uncovers a different surface or condition than expected. For projects in Pahrump, Beatty, Goldfield, and Tonopah, compare what makes sense to buy with equipment you may need only for a short time.
- Finalize the scope. Write down the surfaces, fixtures, and materials that will change, and separate preparation from installation and finishing tasks.
- Match tools to tasks. Add the tool category needed for each step rather than starting with a broad shopping list.
- Choose how to obtain each item. Mark tools to keep, borrow, buy, or rent based on expected repeat use, project timing, and storage space.
- Plan access and timing. Group equipment by the phase when it’s needed and make space to store tools safely between tasks.
- Review the plan before work begins. Check that materials, tools, and protective equipment align with the planned work, and pause to reassess if the scope changes.
Make the next step manageable
For trade professionals organizing equipment needs for a project, contractor registration is a practical place to begin. Pahrump Rentals & Hardware serves local DIY customers and contractors with tool and industrial equipment rentals, hardware, and fasteners.
Keep the final checklist simple enough to use on the job. Note what’s ready, what must be obtained, and when each tool is needed. The goal isn’t to own every tool; it’s to prepare for each task with the right equipment, materials, and safe setup.
Take the Next Step With a Clear Tool Plan
Before your remodel begins, turn your plan into a short working list: what needs to happen, which tools support each task, and when you’ll need them. This gives you a practical way to decide what to set aside, purchase, or rent without filling your workspace with equipment that may never be used. The right tools needed for bathroom remodel work are the ones that fit your actual scope and can be used safely for the task at hand.
If a specialty tool is needed for only one phase, rental can be a useful part of the plan. Pahrump Rentals & Hardware serves local DIY customers and contractors in Pahrump, Beatty, Goldfield, and Tonopah with tool and industrial equipment rentals, along with hardware and fasteners for residential and commercial projects. Explore local tool and equipment rental options as you prepare your checklist.
Take the project one step at a time. Build your task list, then explore Pahrump Rentals & Hardware’s tool and equipment rentals for your project needs.
Frequently Asked Questions
What tools do I need to remodel a small bathroom?
The tools you need depend on which parts of the small bathroom you’re changing. For a paint-and-hardware refresh, measuring and marking tools, screwdrivers, a utility knife, and surface protection may cover much of the work. Replacing a vanity or floor adds different needs. List each task before choosing the tools needed for bathroom remodel work, and account for tight clearances where a full-size tool may be awkward to handle.
Do I need a tile saw for a bathroom remodel?
No, a tile saw is only relevant if your plan involves cutting tile. A project that keeps existing tile or uses materials that don’t need on-site cuts may not require one. If tile does need trimming, the tool choice depends on the tile and cut involved. Plan cuts before installation begins, and follow the tool instructions and appropriate safety guidance for the equipment you use.
Can I remodel a bathroom with basic hand tools?
Basic hand tools can be enough for limited work, such as assembling simple items, changing cabinet hardware, or handling straightforward touch-ups. They aren’t a substitute for task-specific equipment or experience. If the plan expands to cutting tile, altering plumbing, working near wiring, or opening a wall, pause and reassess. Some work may call for specialized tools or qualified tradespeople, especially if you’re unfamiliar with what’s behind a surface.
Should I rent or buy tools for a bathroom remodel?
Buy tools you expect to use repeatedly and can store and maintain; consider renting or borrowing equipment needed for a brief, occasional task. For example, a specialized cutting tool may be unnecessary to own if tile work is limited to one project. Compare the tool’s expected use after the remodel with the space it occupies. Pahrump Rentals & Hardware provides tool and equipment rentals for projects in Pahrump, Beatty, Goldfield, and Tonopah.
What safety gear should I use during a bathroom remodel?
Choose safety gear for the specific hazard, not simply for the room. Eye protection can help guard against flying debris, gloves should suit the material being handled, and hearing or respiratory protection may be appropriate for noisy or dusty tasks. Check the tool and protective-equipment instructions for use and limitations. If dust, noise, or sharp material is part of the job, prepare the right protection before starting.
Can I replace bathroom fixtures without special tools?
Some straightforward fixture changes may use common hand tools, but the requirements depend on the fixture, its fasteners, and the condition of existing connections. Read the installation instructions before removing anything, and identify how the fixture is secured. If a connection is stuck, damaged, or unfamiliar, don’t force it. Work involving plumbing changes beyond your experience is a good point to stop and involve a qualified professional.
What should I prepare before starting a bathroom remodel?
Prepare a written scope, a list of materials, and a sequence for the work before bringing tools into the room. Decide which tasks you’ll handle and which need qualified tradespeople. Make room to move tools and materials without blocking the exit, and plan where removed items will go. Check that the necessary equipment is ready for the first task, rather than discovering a missing item after work has begun.


