
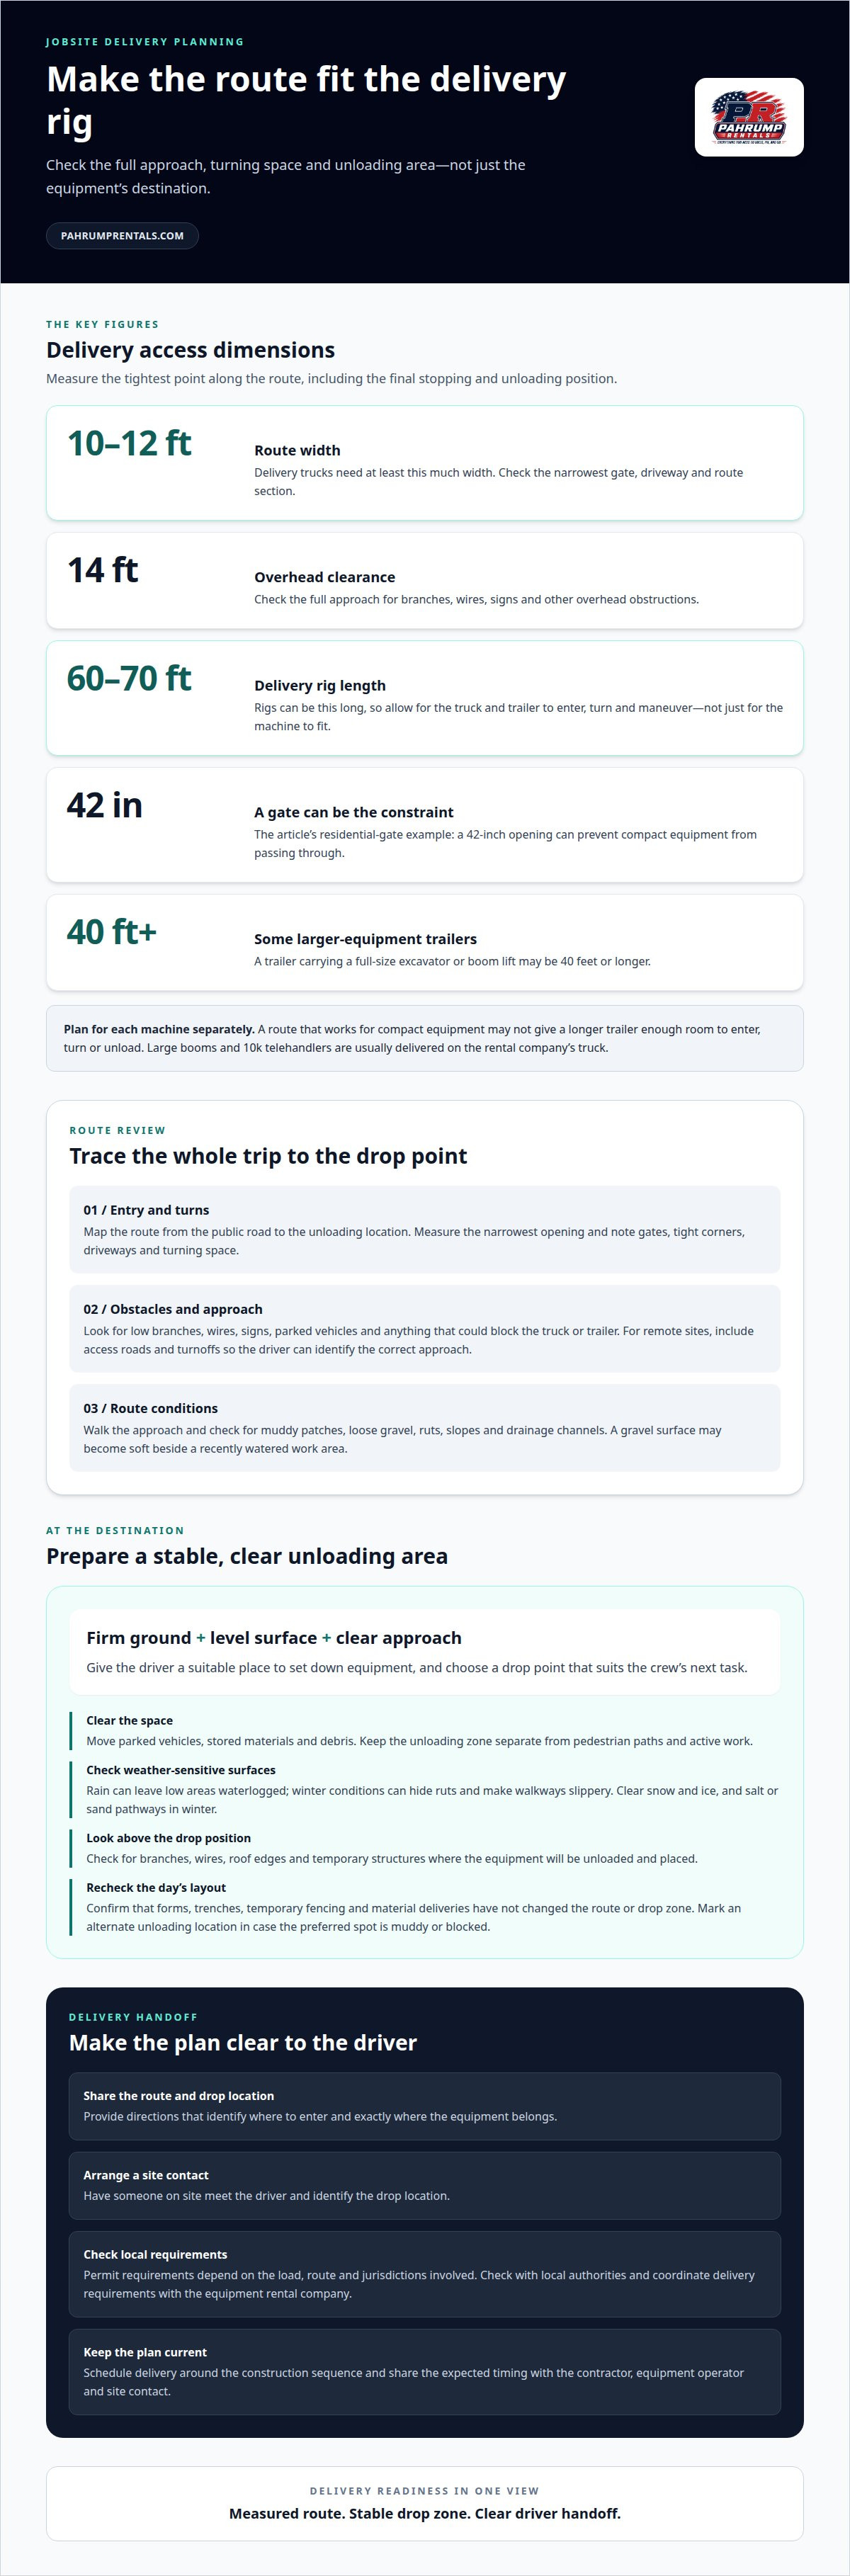
Getting a job site ready for equipment delivery starts with a clear route at least 10-12 feet wide and 14 feet of overhead clearance. Delivery rigs can be 60-70 feet long, so access needs to account for the truck and trailer, not just the equipment. Firm, level ground and a designated unloading area help the driver place the machine where it’s needed.
A clear path is only part of a workable delivery plan. Tight gates, parked vehicles, soft ground, overhead obstructions, or an unclear drop location can complicate unloading and delay the work. To have equipment arrive ready for the crew, plan a safe route in and a suitable place to unload.
This guide explains how to assess access, prepare the ground and unloading area, share useful directions, and choose a staging location. You’ll also learn what to communicate to the delivery driver and how weather or nearby obstacles can affect placement. Planning these details in advance gives the crew and driver a clearer approach to delivery.
Key Takeaways
- Plan the delivery route around the truck and trailer, including turns, gates, overhead obstructions, and a clear approach to the site.
- Choose an unloading area with stable, level ground, and keep it clear of snow, ice, vehicles, and stored materials.
- Give the driver clear directions and arrange for someone on site to meet them and identify the drop location.
- Mark a staging area that gives the crew room to access the equipment without blocking active work zones or site pathways.
- Consider how nearby structures, utilities, obstacles, and changing work areas may affect where equipment can be placed.
How Much Access Does Rental Equipment Need for Delivery?
Plan access around the delivery truck, trailer, equipment, and route to the unloading point. Measure the narrowest opening, overhead clearance, and turning space. Consider the surface along the route, from the entrance to the drop location. These checks help determine whether the route can accommodate both the machinery and its transport vehicle.
Site-Specific Access Constraints
Site-specific access constraints are features of a property that affect how delivery vehicles enter, move, and unload. A narrow gate, tight corner, low branch, or occupied driveway can change the workable route. Measure the tightest point rather than relying on the entrance’s appearance. For example, a residential gate measuring 42 inches wide can prevent compact equipment from passing through.
Map the route from the public road to the intended drop location, noting obstacles that could affect each turn. For remote job sites, include access roads and turnoffs so the driver can identify the correct approach.
Access Needs by Machinery Size
Access needs vary with the equipment’s dimensions and delivery method. Compact machinery may fit through smaller openings, but a narrow gate can still prevent access. A trailer carrying larger equipment, such as a full-size excavator or boom lift, may be 40 feet or longer. Large booms and 10k telehandlers are usually delivered on the rental company’s truck.
Plan delivery access for each machine separately when a project needs different equipment. An opening that suits compact machinery may not give a longer trailer enough room to turn, enter, or unload. The same planning is needed when receiving specialized industrial process equipment, where maneuvering transport rigs for large used jacketed stainless steel vessels demands ample turning space and dedicated staging areas.
Delivery Routes and Truck Clearance
Delivery trucks need at least 10-12 feet of route width and 14 feet of overhead clearance. Equipment delivery rigs can be 60-70 feet long, so the route must accommodate their length and maneuvering needs. Check the full approach for low branches, wires, signs, parked vehicles, and tight corners.
Include gates, driveways, and the final stopping point in the access review. If the route is blocked or the driver cannot reach the planned area, they may need to reposition, wait for access to clear, or reschedule.
Permit and Local Rule Checks
Permit requirements for oversized deliveries depend on the load, route, and jurisdictions involved. No single permit rule applies to every delivery. Identify the local authorities governing the route, then check requirements that could affect vehicle access, street use, or temporary traffic arrangements.
Ask the municipality about restrictions on the planned route, and coordinate delivery requirements with the equipment rental company. A site-readiness checklist can record route width, overhead clearance, gate measurements, turning space, unloading location, directions, and the site contact. For excavation projects, include utility-marking status. Requirements vary by location, so follow the local process before digging begins.
Ground conditions and unloading areas
The unloading area needs to support the delivery vehicle and provide a stable place to set down equipment. Soft soil, standing water, snow, and nearby obstacles can affect where delivery is possible. A firm, level surface gives the driver a suitable place to unload and helps the crew plan where the machinery will sit.
Walk the route from the entrance to the planned drop zone. Look for muddy patches, loose gravel, ruts, slopes, and drainage channels that could affect vehicle movement. For example, a gravel approach may seem solid near the road but turn soft beside a recently watered work area. Mark a practical alternate location in case the preferred spot is muddy or blocked.
Keep the unloading zone clear of stored materials, parked vehicles, debris, and active work. A stack of lumber or a spoil pile can take up the space needed to position equipment safely. Separate pedestrian paths from the unloading area, and leave the driver a clear approach to the chosen location. The drop point should also suit the crew’s next task, so the machinery does not need to cross the site after delivery.
Weather can change ground conditions between planning and arrival. Rain may leave a low area waterlogged, while winter conditions can hide ruts and make walkways slippery. Clear snow and ice from pathways, parking areas, and spaces around containers and trailers. Salt or sand pathways in winter, and keep walkways well lit so drivers and crew members can see surface changes and obstacles.
Check overhead conditions at the unloading position, not just along the route. Look for branches, wires, roof edges, and temporary structures that could interfere with the equipment or delivery process. A clear patch beneath a low tree may still be unsuitable if the machine or its attachments need overhead room. Choose a position where the crew can access the equipment without moving it beneath obstructions.
Before delivery, compare the chosen location with the day’s site layout. Confirm that concrete forms, trenches, temporary fencing, and material deliveries haven’t changed the route or drop zone. If the work area is shifting, communicate the preferred position to the site contact and delivery driver. A clear, level unloading area also helps you choose equipment that suits the work zone. Explore equipment options with ground and access conditions in mind.
Delivery directions and site contacts
Clear directions and a dedicated site contact connect the delivery route with the work plan. When the driver knows where to enter, whom to meet, and exactly where the equipment belongs, they can reach the handoff point with fewer unanswered questions.
Schedule delivery around the construction sequence, then share the expected timing with the contractor, equipment operator, and site contact. Confirm that the unloading area will be clear and someone can meet the driver. Coordinating these details helps prevent equipment from arriving while the crew is using the planned drop area.
Prepare directions for someone unfamiliar with the job site. Include the street address, correct entrance, any gate instructions, and landmarks identifying the final turn. At a remote site, name the access road and describe the turnoff from a recognizable route. If trailers must use a particular entrance, say so clearly rather than giving directions that work only for passenger vehicles.
Assign one person as the delivery contact. That person should know the planned drop location, be reachable during the delivery window, and have authority to direct the driver to an alternate position if conditions change. Someone on site should meet the driver and point out the equipment drop location. A contact who arrives after the truck can leave the driver waiting without a clear unloading plan.
Use a brief coordination review the day before delivery. Set aside 15 minutes to compare the directions, work schedule, and site layout. Confirm that the entrance remains open and that stored materials, parked vehicles, or other deliveries haven’t blocked the route. A concrete review catches changes such as a temporary fence across the planned approach.
- Record the site address, entrance, gate details, and any route restrictions.
- Name the dedicated site contact and share their role with the delivery team.
- Mark the planned drop location using a clear landmark or site reference.
- Tell contractors and operators when equipment is expected and where it will arrive.
- Identify an alternate drop position if work or site conditions block the first choice.
Keep the plan consistent among everyone involved. If the contractor changes the work sequence or the operator needs equipment in a different area, update the site contact before the truck arrives. The contact can then give the driver one clear instruction instead of receiving conflicting directions from several crew members.
For remote job sites, explain where the driver can stop safely and how to reach the person meeting them. A pin or marked site map can identify a turnoff, but include written landmarks as well. The driver should know where to go, and the crew should know who is receiving the delivery.
Equipment staging and placement
A staging area is the designated place where equipment is received and held before moving into active work. Marking the zone gives the driver and crew a shared reference point. It also separates incoming machinery from materials, pedestrian routes, and areas where construction work is underway.
Choose the location based on the next work task, not simply the nearest open space. For example, equipment needed beside a building should be staged where the operator can reach that area without crossing a material laydown zone. Keep the intended travel path visible and clear of stored items. If the crew will move the machinery after delivery, identify both its initial staging position and its planned work position.
Consider how the machine will be accessed after delivery. Leave room for the operator to approach the controls and for the crew to reach attachments or supplies used with the equipment. Keep staging clear of vehicle routes and active work areas. A machine beside a trailer or stacked materials may be difficult to move, even if the original drop point was accessible.
Mark the staging zone on a site map, with visible stakes, or with another clear reference the crew and driver understand. Use a landmark such as a building corner or marked gate instead of directions like “near the back.” If the site has separate work zones, label each intended location. This is especially useful when different machines are arriving for separate tasks.
- Identify the delivery drop point and the machine’s next work position.
- Keep a clear path between the staging zone and the work area.
- Separate equipment from pedestrian paths, stored materials, and active construction.
- Tell the site contact about changes before the delivery arrives.
Plan for the work zone to change. A towable portable air compressor can be repositioned as project needs shift, so leave a practical route between work areas. For example, a crew working across different parts of a site can choose an initial location that does not block later movement. Gravel, temporary barriers, and stored supplies can all affect that route as work progresses.
Before equipment is placed, the site contact should tell the driver where it belongs. If the marked zone is occupied, direct the driver to a prepared alternative rather than improvising beside active work. A clear placement plan helps the crew receive the machinery and organize its next move. Review available equipment options alongside the staging plan to match the machine to its intended use.
Firm, level ground for unloading
Firm, level ground is the recommended condition for safely unloading rental equipment. The delivery vehicle and equipment need a stable area for the unloading process, and a level surface gives the driver a clear place to set down machinery. A nearby work area may look convenient but still have soft soil, loose fill, or a slope that affects placement.
Walk the unloading area before delivery and check for changes in the surface. Look for soft patches, standing water, ruts, loose gravel, and recently disturbed ground. For example, a packed entrance may lead to a muddy section where trucks have crossed repeatedly. Check the full approach and drop area, not only the spot beneath the equipment’s final position.
Consider how weight is distributed as equipment moves across the site. A truck or machine can press into soft ground and leave ruts, making later access harder for the crew. A surface that looks level can also hide uneven spots beneath loose material. If rain or excavation has changed the planned area, choose another prepared position rather than directing the delivery onto uncertain ground.
Keep the unloading area clear of trenches, excavation edges, material piles, and temporary barriers. An open space gives the driver room to place equipment without crowding active work. It also helps operators move the machine toward its task without crossing obstacles. For example, a direct path from the drop point to a work zone lets the crew continue without first shifting stored supplies.
- Inspect the entire approach and drop area for soft or uneven sections.
- Remove loose materials that obstruct the truck’s position or equipment movement.
- Keep trenches, excavation edges, and active work away from the unloading space.
- Choose an alternate area if weather or site work changes the ground.
Winter conditions need a separate surface check. Clear snow and ice from walkways, parking spaces, and areas around containers and trailers. Salt or sand pathways, and keep walkways well lit. These steps help people see surface changes while moving around the unloading area. Recheck the ground after snowfall or freezing conditions, since an earlier inspection may no longer reflect the surface at arrival.
Before the truck arrives, have the site contact confirm that the chosen area remains firm, level, and clear. If the original position is no longer suitable, direct the driver to a prepared alternative. This simple check helps delivery proceed efficiently and reduces unnecessary movement across the job site. Review equipment options alongside the site’s ground conditions and intended work.
Pahrump Rentals & Hardware: Industrial Equipment Rentals
Pahrump Rentals & Hardware offers Industrial Equipment Rentals and Tool Rentals for projects that need equipment suited to planned site access and work areas. Consider the route, ground conditions, unloading space, and intended staging location when deciding what your project needs. Professional Hardware Solutions can support related job-site requirements, and the Contractor Portal provides a dedicated resource for contractors.
Once you’ve identified the equipment and prepared a suitable place for it, Pahrump Rentals & Hardware can help with the next stage of your project. Contact the team to discuss your equipment rental needs.
Put Your Delivery Plan Into Action
A prepared site gives your crew a clear starting point. Make the delivery plan part of the project schedule, and update it whenever work areas, access, or site conditions change. This keeps the arrangement connected to the actual job instead of relying on an outdated plan.
As you finalize the next construction task, match the equipment to the work it needs to support. Knowing what the crew will do, where it will happen, and how the equipment fits into the sequence helps move planning forward. The same practical approach to getting a job site ready for equipment delivery can help your team begin work with fewer unresolved details.
Pahrump Rentals & Hardware offers Industrial Equipment Rentals, Professional Hardware Solutions, and Tool Rentals for project needs. If you’re ready to discuss equipment for an upcoming job, contact Pahrump Rentals & Hardware. Take the next step with a plan that fits your work and your site.
Frequently Asked Questions
How Do You Clear a Jobsite for Safe Equipment Unloading?
Clear the delivery path and unloading area of vehicles, loose materials, debris, and temporary obstructions. Keep workers out of the truck’s maneuvering space, and make sure the driver can reach the planned drop point. For example, move pallets away from a gate before the truck arrives. Have a site contact available to direct the driver if the planned space changes.
What Ground Conditions Are Best for Equipment Delivery?
Firm, level ground is the preferred surface for unloading equipment. Look for soft soil, standing water, ruts, loose fill, and slopes that could affect the truck’s approach or placement. A gravel area may be suitable in one part of the site but loose or uneven elsewhere. After rain or snow, reassess the planned position because surface conditions may have changed since preparation.
What Is Jobsite Preparation?
Getting a job site ready for equipment delivery means arranging access and site areas so equipment can arrive and fit into the work plan. This includes coordinating a delivery contact, keeping the route clear, and choosing where equipment will be staged. For example, a crew may need to move stored materials to keep a work area accessible. Preparation connects delivery plans with the project’s tasks and sequence.
What happens if the jobsite isn't ready when equipment arrives?
If the route or drop area is blocked, the driver may need to reposition, wait for access to clear, or reschedule delivery. This can affect the crew’s planned work sequence, especially if operators or other trades are waiting to use the equipment. A site contact can help by identifying a safe alternate location and communicating it promptly. If no workable access or unloading position is available, delivery cannot proceed as planned.
Who is responsible for marking utility lines before delivery?
The project lead or contractor coordinating excavation should arrange utility marking before digging begins. The request should cover the planned work area, since marks are useful only where they identify the relevant underground lines. Keep markings visible and tell the crew operating digging equipment where they are. For delivery planning, distinguish bringing machinery onto the site from beginning excavation, which requires attention to underground utilities.
How much clearance and access width do equipment delivery trucks need?
Plan for at least 10-12 feet of route width and 14 feet of overhead clearance. Delivery rigs can be 60-70 feet long, so a route must also allow them to turn and maneuver. Measure the tightest entrance and check for branches, signs, wires, or other overhead obstacles. A gate opening alone doesn’t establish that the truck can make the full approach to the unloading area.
What ground conditions and load-bearing capacity are needed for heavy equipment delivery?
Use firm, level ground that can support the delivery vehicle and equipment during unloading. Surface condition, moisture, slope, and composition affect how well the ground supports a load. Recently filled areas or wet soil may behave differently from compacted ground nearby. If the planned position has soft spots or visible ruts, select a more stable area rather than relying on appearance alone.
How should a job site prepare a staging area and unloading zone?
For getting a job site ready for equipment delivery, designate a drop point that clearly connects with the equipment’s next task. Keep it separate from stored materials and pedestrian paths, and identify it with a site map or recognizable landmark. Tell the site contact where the equipment should go, and identify an alternate position in case the intended area becomes occupied. This helps the crew coordinate placement with the project’s work sequence.


