

The right PEX fitting matches the pipe size and connection method, not simply the lowest price. PEX pipe fittings in Pahrump vary by type, material, size, and package quantity. Common options include elbows, tees, couplings, plugs, crimp rings, clamps, and threaded adapters.
Choosing fittings can feel complicated when a repair or installation involves a manifold or a transition to another supply line. The connection method matters too: crimp, clamp, expansion, and push-to-connect fittings use different approaches, so each part must suit the tubing and the task.
This guide explains what each fitting does, how manifolds and supply adapters fit into a PEX layout, and what affects local pricing and availability. You’ll also learn how to compare connection methods and plan a project in Pahrump, whether you’re gathering parts for a small repair or organizing a larger installation.
Key Takeaways
- Match each fitting to the pipe size, fitting material, and connection method to plan a dependable PEX layout.
- Learn how manifolds and threaded supply adapters help organize branch lines and connect PEX to other plumbing components.
- Compare fitting styles and package quantities to estimate the parts a project calls for and understand local pricing factors.
- See how push-fit, crimp, expansion, and press connections differ, and what compatibility details matter before choosing a method.
- Find out how Pahrump Rentals & Hardware’s professional hardware solutions and tool rentals can support project preparation.
PEX fittings
PEX fittings connect tubing, redirect flow, branch lines, or close unused ends. In Pahrump, choose each fitting based on pipe size, connection method, and layout.
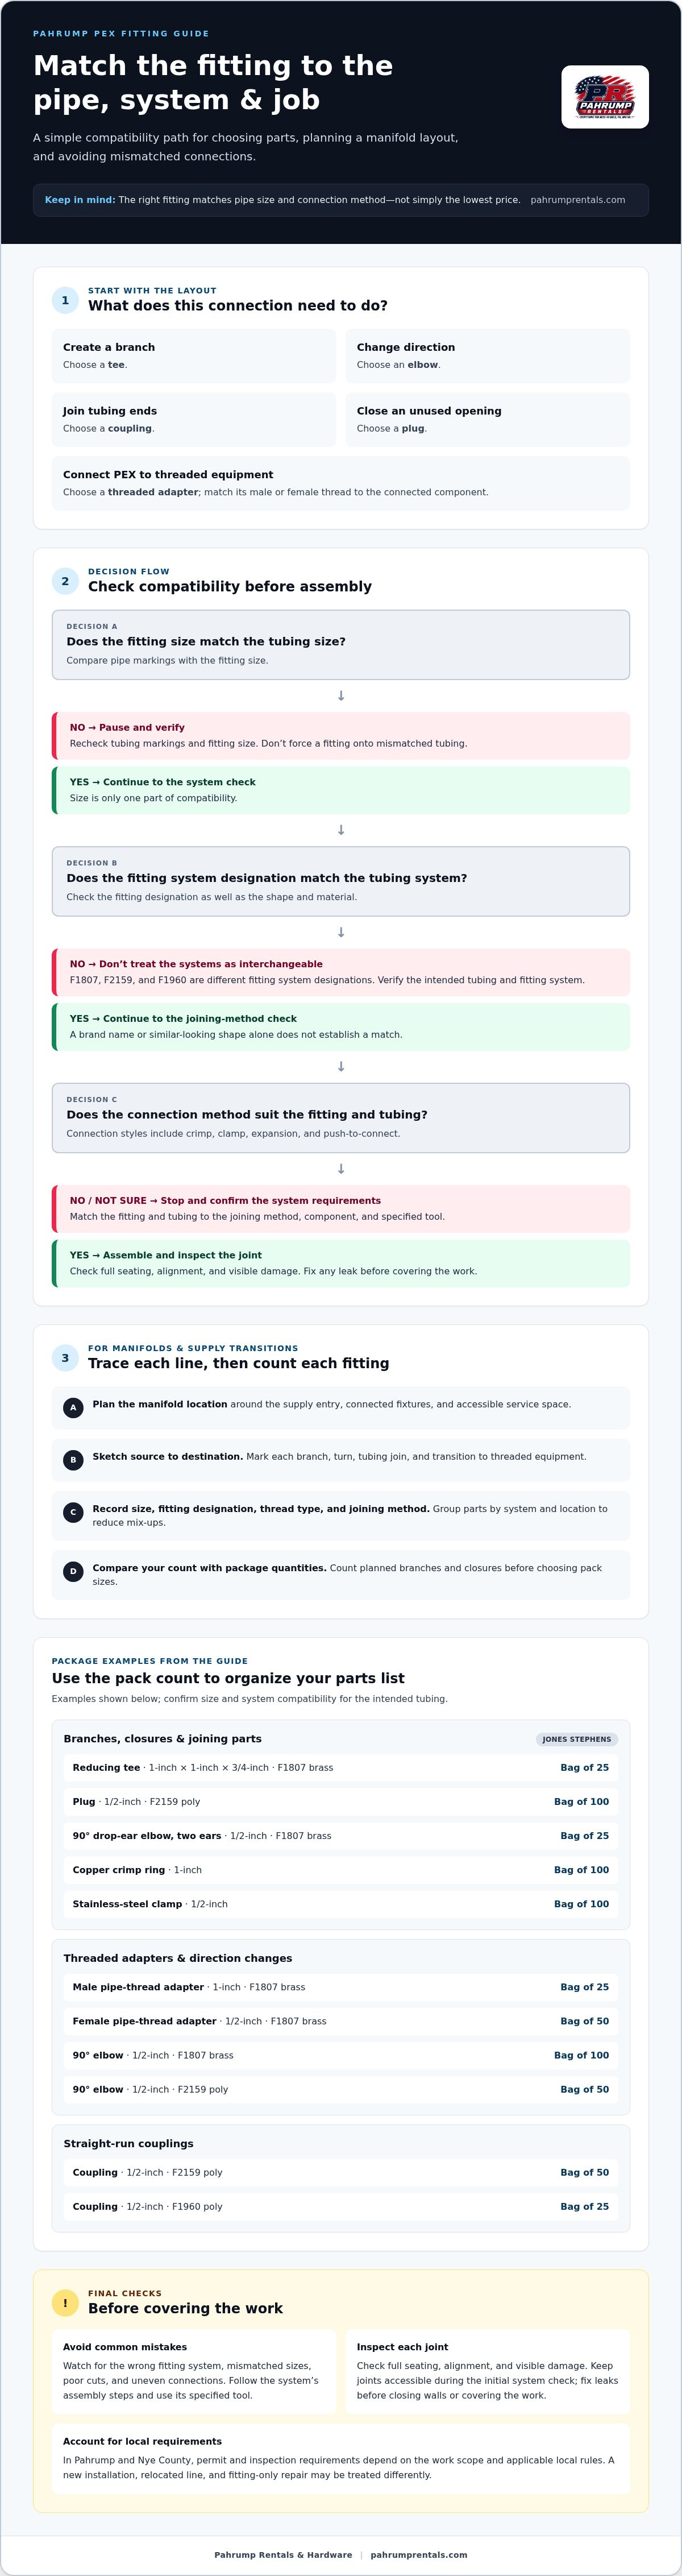
A tee creates a branch, while an elbow changes direction. A coupling joins two tubing ends, and a plug closes an opening. A threaded adapter connects PEX to a compatible threaded component. Each shape serves a different layout need, so identify the connection point before choosing a part.
Package quantities also affect planning. A Jones Stephens 1-inch-by-1-inch-by-3/4-inch F1807 brass PEX reducing tee comes in a bag of 25. A Jones Stephens 1/2-inch F2159 poly PEX plug comes in a bag of 100. Count planned branches and closures before choosing package sizes.
Other examples include the Jones Stephens 1/2-inch F1807 brass PEX 90° drop-ear elbow with two ears, sold in bags of 25. A Jones Stephens 1-inch PEX copper crimp ring comes in a bag of 100. A Jones Stephens 1/2-inch stainless-steel PEX clamp also comes in a bag of 100. These quantities can help organize a parts list.
Compatibility Across PEX Pipe Types
Fitting compatibility depends on the tubing size, fitting system, and connection method. Brand name alone doesn’t establish a match. Compare the pipe markings with the fitting’s size and system designation. For example, F1807 and F2159 identify different fitting systems, so don’t treat them as interchangeable. A compatible-looking shape may still require a different connection tool or component.
Check that the fitting and tubing are intended to work together before assembly. Record the tubing type, fitting designation, and joining method in your project notes. This simple step helps prevent mixing parts that look alike but belong to different systems.
For Pahrump and Nye County, permit and inspection requirements depend on the work scope and applicable local rules. A new installation, a relocated line, and a fitting-only repair may be treated differently, so don’t assume the same requirements apply to every project.
PEX fittings can suit local plumbing conditions when the tubing and fitting are appropriate for the intended use and applicable requirements. Water conditions, component materials, and the project’s plumbing specifications all matter. Choose fittings based on these factors, not appearance alone.
Installation Mistakes and Leak Risks
Common mistakes include using the wrong fitting system, mismatching sizes, and making an uneven connection. For example, a crimp ring must suit the fitting and tubing system. A poor cut can prevent the tubing from seating correctly. Follow the system’s assembly steps and use its specified tool.
Inspect every joint for full seating, alignment, and visible damage. A loose or incomplete connection can leak and damage nearby materials. Keep joints accessible during the initial system check, and fix any leak before closing walls or covering the work. Never force a fitting onto mismatched tubing.
Before installation, sort fittings by size and purpose. Set aside tees for branches, elbows for turns, and plugs for unused ports. Match each part to its tubing and connection method. This keeps the PEX layout organized and helps prevent avoidable assembly errors.
PEX manifolds and supply adapters
A manifold organizes separate PEX lines from a single distribution point, making branch routes easier to identify and isolate. Plan its location around the supply entry, connected fixtures, and accessible service space. A clear layout also shows where adapters, elbows, and couplings belong.
Sketch each line from its source to its destination. Mark every branch, turn, and transition to threaded equipment. For example, a supply entering a manifold may need an adapter, a branch changing direction may need an elbow, and a line extended between tubing sections may need a coupling.
Adapters bridge different connection types. The Jones Stephens 1-inch F1807 brass PEX adapter with male pipe thread comes in bags of 25. The Jones Stephens 1/2-inch F1807 brass PEX adapter with female pipe thread comes in bags of 50. Select male or female threads to match the connected component.
Thread descriptions identify the adapter’s threaded side, but don’t replace checking the PEX connection system. Match the tubing size and fitting designation as well. Record the size, thread type, and fitting system in a parts list to reduce mix-ups when assembling a manifold layout.
Elbows guide tubing around an obstacle or toward an outlet. The Jones Stephens 1/2-inch F1807 brass PEX 90° elbow comes in bags of 100. The Jones Stephens 1/2-inch F2159 poly PEX 90° elbow comes in bags of 50. Compare the system designation before selecting either fitting.
Both material and connection system matter. Brass and poly elbows may serve similar directional roles, but their designations differ. Pair each fitting with compatible tubing and its joining method. Don’t choose by angle or size alone. A parts schedule can group elbows by system and location.
Couplings join compatible tubing sections in a straight run. The Jones Stephens 1/2-inch F2159 poly PEX coupling comes in bags of 50. The Jones Stephens 1/2-inch F1960 poly PEX coupling comes in bags of 25. Their different system identifiers matter, even though both are 1/2-inch poly couplings.
Before placing components, trace the route on your sketch. Note where a coupling extends a line, an elbow changes direction, and an adapter meets threaded equipment. Then group fittings by designation and size. This helps prevent ordering a visually similar but incompatible connection.
For a manifold plan in Pahrump, count each branch and transition individually. List the fitting type, size, and system beside each location. Account for package quantities when comparing your count with available pack sizes. An organized list gives the installation a clearer starting point.
Product pricing and availability
When comparing PEX pipe fittings in Pahrump, compare complete parts lists rather than isolated items. Cost depends on fitting type, material, size, connection system, and package quantity. A single elbow and a bag of rings contain different quantities. Pipe length and format also affect how much material a project needs.
Compare equivalent components before judging price differences. A push-to-connect elbow serves a different purpose from a straight pipe length. First match the product type, dimensions, and connection method. Like-for-like comparisons make estimates more useful and keep them aligned with the planned repair or installation.
Pipe formats can change the amount purchased. For example, listed SharkBite options include a 1/2-inch by 5-foot straight length and a 1/2-inch by 100-foot coil. A short repair may call for a straight length, while a longer route may suit a coil. Measure the run before selecting a format.
Availability depends on the specific configuration. A 1/2-inch elbow and a 3/4-inch threaded adapter are distinct parts. Fitting system and material further narrow the match. Write each requirement beside its location on the project plan, so the parts list reflects the actual connections.
Package quantity also affects purchasing decisions. Some PEX components come in bags, while pipe may be sold by length or coil. Compare the number of pieces required with the package count to avoid buying too little or more than the project needs.
Use this sequence to prepare a useful estimate:
- Measure each run and note its diameter.
- Record every turn, branch, and threaded transition.
- Identify the connection system for each joint.
- List the required fitting type and quantity.
- Compare matching products and package formats.
For example, a repair may need one elbow and a short pipe section, while a longer layout may require several fittings and a coil. The route, transitions, and connection method determine the parts list. Measure first instead of choosing a product based on length alone.
In Pahrump, prepare by noting the exact specifications: pipe diameter, fitting style, system designation, and desired package quantity. These details distinguish similar-looking parts and clarify which options suit the project.
Comparing PEX pipe fittings in Pahrump is easier with one complete list. Group items by size and connection system, then compare like-for-like components. This keeps project planning focused on the materials the work actually requires.
Push-fit, crimp, expansion, and press fittings
Each connection method joins PEX tubing with a different fitting design. Choose a method that matches the tubing, fitting system, and available tools.
Push-Fit and Crimp Fittings
A push-fit connection joins tubing by inserting its end into the fitting. A SharkBite 1/2-inch push-to-connect elbow is one example. Cut the tube square, check the fitting’s size, then insert it to the required depth. This method avoids a separate crimping step, but correct sizing and seating still matter.
Crimp fittings use a ring tightened around tubing and a compatible fitting. For example, the Jones Stephens 1-inch PEX copper crimp ring is sold in bags of 100. Select the ring, fitting, and pipe for the same system. Use the specified crimp tool, and keep the ring positioned as instructed.
Before assembly, compare the tubing markings with the fitting designation. A crimp ring may look simple, but the connection depends on using the right components and tool. Don’t substitute a clamp or ring from another method. For repairs, identify the existing system before choosing replacement parts.
Expansion and Press Fittings
Expansion fittings require a compatible expansion tool and fitting system. The tool expands the tubing end so the fitting can be inserted. The tubing then contracts around the fitting. Follow the system’s specified tool sequence, and match the fitting to the pipe type and diameter.
Press fittings use a press tool to secure a compatible fitting onto prepared tubing. The fitting and tool must match the intended connection system. For example, a crimp tool cannot be assumed to make a press connection. Check the method designation and tool compatibility before laying out the work.
These methods differ in their parts, tools, and assembly steps. Compare them with the project’s access, existing connections, and chosen tubing system. In a crowded repair area, tool clearance may be a practical concern. A long run may require repeating the same steps across many joints.
Use this sequence to plan a connection:
- Read the tubing markings and identify its size.
- Choose a fitting system compatible with that tubing.
- Confirm the required tool matches the connection method.
- Prepare the tube end using that system’s instructions.
- Assemble the joint, then inspect its seating and alignment.
Don’t mix methods within a joint. A push-fit fitting doesn’t use a crimp ring, and an expansion fitting requires its own compatible process. Keep the fitting, tubing, and tool together as one system so the method is clear before installation.
For projects in Pahrump, list the connection method beside each joint. Mark whether each location uses push-fit, crimp, expansion, or press. This helps organize parts and tools, especially when connecting to existing plumbing.
Are PEX fittings compatible with all PEX pipe brands and types?
Not automatically. Brand name alone doesn’t establish compatibility. Match pipe size, fitting system, and connection method. For example, a 1/2-inch fitting isn’t the right match for every pipe diameter. Check the tube markings and fitting designation before planning a connection.
PEX tubing can use different fitting systems. F1807, F1960, and F2159 appear on distinct fitting products. Those identifiers help distinguish the intended connection system. A Jones Stephens 1/2-inch F1960 coupling and a 1/2-inch F2159 coupling share a size, but have different designations. Don’t select by size alone.
Pipe type matters too. PEX-A, PEX-B, and PEX-C describe tubing types, not universal fitting compatibility. The fitting and tubing specifications determine whether a connection is suitable. Match the specific pipe type to the fitting system instead of assuming every fitting works with all PEX tubing.
Use this checklist before assembling parts:
- Read the pipe markings for size and type.
- Record the fitting system, such as F1807 or F1960.
- Match the joining method to the fitting.
- Check whether the fitting is specified for that tubing.
- Keep compatible parts together during installation.
Material and connection method add another compatibility check. A Jones Stephens 1/2-inch F1807 brass elbow differs from a 1/2-inch F2159 poly elbow. Both turn a line, yet their system designations differ. Treat the fitting’s shape and material as separate from its connection requirements.
Brand differences don’t always determine compatibility. A fitting from one manufacturer may suit tubing from another when the stated sizes and systems align. But familiar dimensions alone don’t confirm a match. Use product markings and system specifications to identify the intended pairing.
For an existing repair, identify the installed connection before buying replacement pieces. Look for pipe printing, fitting markings, and the visible ring or connection style. A Jones Stephens F1807 crimp component, for example, identifies a system detail worth recording. Don’t replace it based only on a similar-looking part.
For a new layout, record each pipe segment and its fittings together. Pair the tubing type and diameter with the fitting designation and installation method. This parts schedule helps prevent mixed systems and clarifies each connection before work begins.
Pahrump Rentals & Hardware: Industrial Equipment Rentals
Pahrump Rentals & Hardware offers industrial equipment and tool rentals, along with professional hardware solutions for project needs beyond selecting compatible PEX fittings. Use these services when your plumbing work also requires equipment or tools. Keeping the fitting system, pipe size, and connection method organized helps you plan the work and identify useful equipment.
Contractors can use the Contractor Portal as part of project planning. The next step depends on the work: equipment needs may call for a rental, while broader project requirements may call for professional hardware solutions. Contact Pahrump Rentals & Hardware or visit pahrumprentals.com to get started.
Prepare Your Next PEX Project
A dependable connection starts with a clear plan. For PEX pipe fittings in Pahrump, consider the pipe layout, fitting system, and required tools together. Mapping these details before work begins helps organize materials and clarify the next steps.
When a project requires tools or equipment, Pahrump Rentals & Hardware offers tool rentals, industrial equipment rentals, and professional hardware solutions. These services can support practical work around a plumbing project, from preparing the work area to organizing the equipment needed for the task.
Whether you’re planning a repair or preparing for a larger installation, a well-organized start makes it easier to move forward with care. Contact Pahrump Rentals & Hardware to discuss how its offerings can support your project. Take the next step with a plan that fits the work, and approach your PEX project with confidence.
Frequently Asked Questions
What types and sizes of PEX fittings are available in Pahrump?
Common fitting types include elbows, tees, couplings, plugs, crimp rings, clamps, and threaded adapters. Market listings show sizes such as 1/2-inch, 3/4-inch, and 1-inch, with fitting systems including F1807, F1960, and F2159. Options and pack quantities differ by product. For projects in Pahrump, Beaty, Goldfield, or Tonopah, start by listing each connection and its required size.
How much do PEX fittings cost at Pahrump hardware and plumbing stores?
PEX fittings don’t all have the same price. Cost depends on fitting type, material, size, connection system, and package quantity. A single adapter and a bag of rings are different purchases, so compare matching parts and quantities. A project-specific total depends on the selected parts and quantities and is provided after a quote request.
What are the differences between crimp, clamp, and push-fit PEX fittings?
Crimp connections secure compatible tubing and fittings with a crimp ring and matching tool. Clamp connections use a clamp tightened around the joint with the appropriate tool. Push-fit fittings join tubing when its prepared end is inserted into the fitting. For example, in a tight cabinet, tool access may be an important planning factor. Every method still requires compatible parts and correct assembly.
How do I choose the correct PEX fitting size and connection type?
Read the pipe markings, then match the fitting’s diameter and system designation. If repairing a line, inspect the existing joint, since its connection method can guide replacement choices. For a new branch, note the pipe size, fitting purpose, and required tool before gathering parts. Keep these details together in a written list to help prevent mismatches in Pahrump and nearby communities.


