
Waiting for a hard freeze is too late. Winterize your RV before overnight temperatures consistently reach 32°F or below. An RV winterization service in Pahrump can help protect water lines and plumbing, but the right timing starts with watching the forecast.
Pahrump’s mild daytime weather can make it tempting to put off winterizing your RV. The risk comes with overnight cold: water left in pipes, tanks, or appliances can freeze, expand, and cause leaks or damage.
This guide explains when to start winterizing, how to protect your plumbing, appliances, tires, and exterior, and what the process involves. You’ll also see where DIY makes sense, when professional help may be useful, and which factors affect service costs, so you can plan with confidence.
Key Takeaways
- Start winterizing before overnight temperatures consistently reach 32°F or below to reduce the risk of frozen plumbing.
- Use RV-specific antifreeze, bypass the water heater first, and protect plumbing low points and outdoor showers.
- Keep stored appliances and exterior surfaces in mind: prop refrigerator doors open and choose a breathable RV cover.
- Compare DIY preparation with professional help by considering your RV’s equipment and the steps involved in clearing its plumbing.
- Understand what can affect professional winterization costs, including the RV and the scope of service.
DIY versus professional winterization
Yes, mobile RV technicians can winterize RVs at campsites or homes in Pahrump when they can access the RV and its plumbing. A clear work area and access to the water system help the technician complete the process on site.
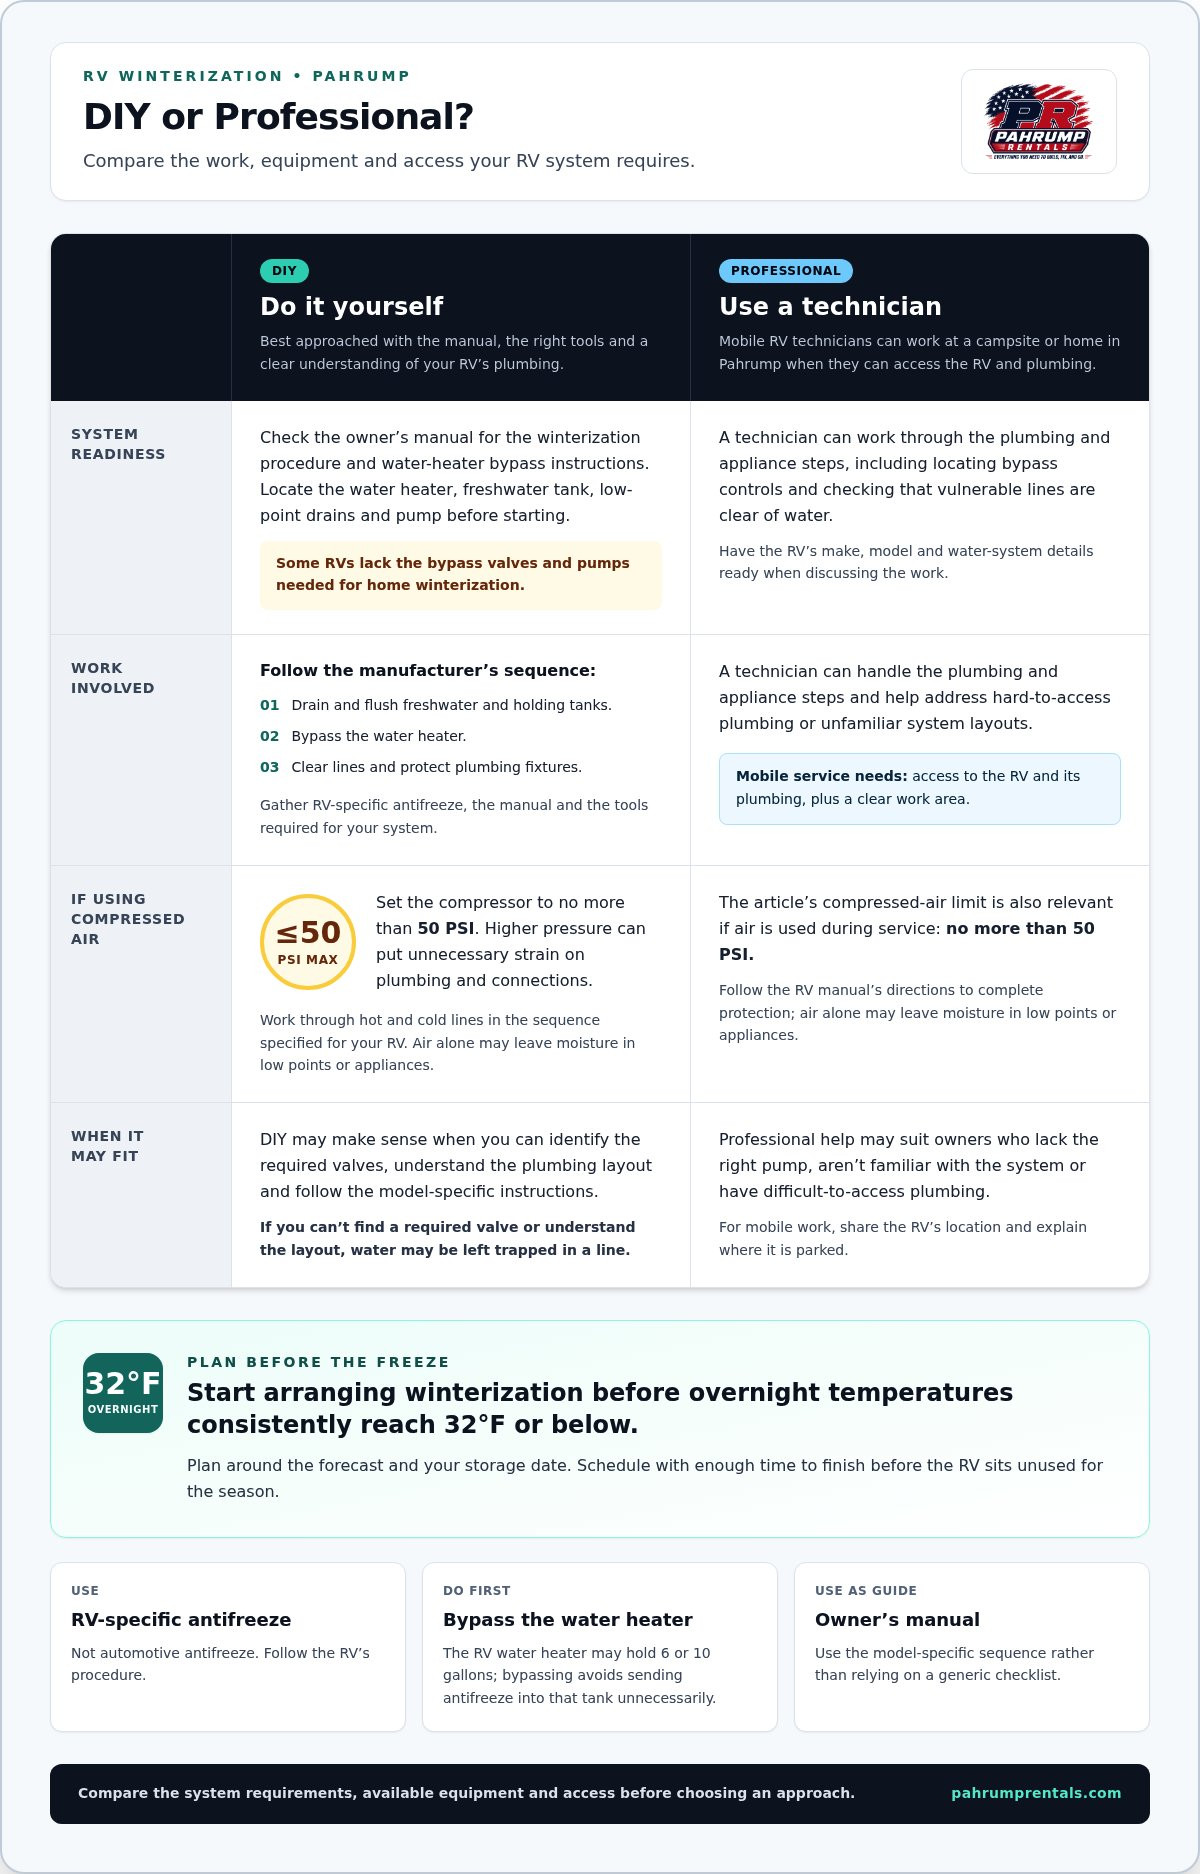
- Assess your RV’s equipment before choosing DIY. Check the owner’s manual for water-heater bypass instructions and the winterization procedure. Some RVs lack the bypass valves and pumps needed for home winterization. Locate the water heater, freshwater tank, low-point drains, and pump before gathering supplies. If you can’t find a required valve or understand the plumbing layout, professional help can reduce the risk of leaving water trapped in a line.
- Compare the basic DIY task with the full process. The work still involves draining and flushing freshwater and holding tanks, bypassing the water heater, clearing lines, and protecting plumbing fixtures. Follow the manufacturer’s sequence rather than relying on a generic checklist. Gather RV-specific antifreeze, the manual, and the tools required for your system before you begin.
- Use compressed air only within the stated limit. If you blow water out of the plumbing, set the compressor to no more than 50 PSI. Higher pressure can put unnecessary strain on RV plumbing and connections. Open faucets and drains in the sequence specified for your RV, and work through hot and cold lines. Air alone may leave moisture in low points or appliances, so follow the manual’s directions for completing protection.
- Choose professional service for a complicated system. A technician can work through the RV’s plumbing and appliance steps, including locating bypass controls and checking that vulnerable lines are clear of water. This may suit owners who lack the right pump, aren’t familiar with the system, or have difficult-to-access plumbing. Have the RV’s make, model, and water-system details ready when discussing the work.
- Plan the appointment around the forecast and your storage date. Start arranging winterization before overnight temperatures consistently reach 32°F or below. For mobile work, provide the campsite or home location and explain where the RV is parked. Clear access to exterior connections and interior plumbing makes the appointment more practical. If you’re winterizing a travel-ready RV, schedule with enough time to finish before it sits unused for the season.
How Do You Protect Appliances and Exterior?
Winter storage involves more than plumbing. Use these steps to protect the RV’s appliances, roof, seals, tires, and bodywork before parking it for the season.
- Inspect the roof and exterior seals. Walk around the RV and look for cracked sealant, lifted edges, gaps, or visible damage around roof joints, vents, windows, and doors. Check the owner’s manual for inspection and repair materials suited to your roof type. Don’t cover a leak with a tarp and assume it’s fixed. Water can enter through a small opening and damage the interior while the RV sits unused.
- Clean exterior surfaces before covering the RV. Remove dirt and debris from the body, roof, and awnings with products suited to those materials. Let surfaces dry before storage, especially around seams and trim. A breathable RV cover helps shield the exterior while allowing moisture to escape. Avoid plastic tarps, which can trap moisture against the RV and contribute to surface problems beneath the cover.
- Inspect tires by age and condition. Check each tire’s sidewalls for cracking, bulges, or other visible damage, and inspect pressure according to the RV and tire manufacturers’ guidance. Tires older than five to seven years should be inspected closely, regardless of tread depth. Record concerns before storage so you can address them before spring travel. Tread alone doesn’t show the full condition of an aging tire.
- Prepare the refrigerator and freezer for storage. Remove food, clean spills, and dry the interior before leaving the RV parked. Prop both doors open to help prevent mold in closed compartments. Secure them in that position without forcing the hinges or seals. A clean, dry interior also makes it easier to spot odors or moisture when you return in spring.
- Protect exposed exterior components. Close windows, vents, and appliance access panels, then check that the cover doesn’t block openings that need ventilation. Secure loose awning fabric and remove items that could rub against the RV in wind. Check that the cover fits without rubbing against sharp edges or catching on roof equipment. If a technician inspects the RV, point out any roof seams or exterior areas you’ve noticed.
Can I use regular antifreeze in my RV plumbing?
No. Use RV-specific antifreeze, not automotive antifreeze, and follow the RV’s winterization procedure. Complete the steps in sequence to protect plumbing and appliances.
-
Choose RV-Safe Antifreeze
Choose antifreeze labeled for RV plumbing, not automotive antifreeze. RV winterization uses non-toxic antifreeze in the plumbing system. Read the product directions and the RV owner’s manual before starting, since the manual explains how that model’s water system is arranged. Keep antifreeze separate from drinking water and other supplies to avoid mixing up containers during the procedure.
-
Use Antifreeze in RV Plumbing
Prepare the plumbing system before adding antifreeze. Bypass the water heater first, then flush water from the lines and tanks as the RV procedure directs. This prevents antifreeze from filling the heater tank instead of protecting the plumbing. RV water heaters may hold 6 or 10 gallons, so bypassing the heater also avoids sending antifreeze into that tank unnecessarily.
- Drain and flush the water system. Follow the RV manual to empty the freshwater and holding tanks, then flush them completely. Open the designated drains and faucets as directed so water leaves the system before antifreeze goes in. Pay attention to both hot and cold plumbing. If water remains in a line, adding antifreeze without first following the drain-and-flush procedure can leave the system inadequately prepared.
- Route antifreeze through the plumbing. Use the RV’s winterization connection or pump procedure described in its manual. Move antifreeze through each faucet and plumbing branch in the stated sequence, rather than stopping after one fixture. Include the toilet and other connected appliances listed in the RV instructions. The goal is to protect the water-carrying parts of the system, not to pour antifreeze into unrelated compartments.
- Protect appliances and vulnerable outlets. Follow appliance instructions for water-connected equipment, and direct antifreeze through those components where the RV procedure requires it. Include outdoor showers and plumbing low points, which can retain water if overlooked. Work through each outlet methodically and track completed fixtures. A written checklist helps prevent skipping a bathroom faucet, exterior connection, or appliance.
- Keep the procedure specific to your RV. Before storing the RV, compare completed steps with its winterization instructions. Confirm that the water heater was bypassed, tanks were flushed, and antifreeze reached the plumbing and applicable appliances. Don’t substitute automotive antifreeze or assume every RV uses the same pump and valve arrangement. Plumbing differences affect the order and connection points used during winterization.
When to winterize based on freezing temperatures
Use overnight forecasts to plan winterization before freezing temperatures put water inside your RV at risk. In Pahrump, prepare before overnight temperatures consistently reach 32°F or below.
-
Time Winterization Before Freezing
Start preparing when the forecast shows overnight temperatures approaching 32°F, and finish before they consistently reach that point. RV water lines can start freezing below 30 degrees Fahrenheit; more than 30 minutes at that temperature is a practical trigger for concern. Don’t rely on warm afternoons to protect plumbing overnight. Check the forecast for the RV’s actual storage location.
-
Prevent Plumbing Damage from Freezing
Protect the entire plumbing system, not just the main water lines. Water left in tanks and pipes can freeze, expand, and crack components. Pipes inside cabinets or beneath sinks can also burst and leak into the RV as ice melts. Before storage, account for concealed lines, outdoor showers, and plumbing low points where water may remain.
- Use the RV’s layout to make a winterization checklist. Identify the freshwater tank, holding tanks, water heater, faucets, and drain points. Include cabinets, under-sink areas, and exterior connections in your inspection. A checklist based on your RV’s layout helps you track each part of the plumbing system rather than focusing only on visible faucets. Follow the manual for the correct drain and winterization sequence.
- Give exposed plumbing extra attention. Outdoor showers and low-point drains can retain water even after other parts of the RV are prepared. Include them in your winterization steps, along with accessible plumbing beneath sinks. If the RV will sit unused during a cold spell, complete the full process before parking it. A brief temperature dip can still affect lines that hold standing water.
- Consider battery condition during cold storage. A discharged lead-acid RV battery can freeze at temperatures just below 32°F, even as the plumbing needs protection from cold. Disconnect and store the battery properly, or use a trickle charger during winter storage. For a lithium battery, follow its manufacturer’s storage guidance. Treat battery preparation as a separate task from draining the plumbing.
- Complete preparation before leaving the RV unattended. After draining and protecting the water system, walk through your checklist. Check accessible areas for remaining water, including the outdoor shower and plumbing low points. Then secure the RV for storage and note any work still needed. Completing these steps before freezing temperatures arrive helps limit the chance of water freezing in an overlooked line.
RV winterization service costs
Compare winterization estimates by the work included, not the headline alone. The RV’s plumbing layout and service scope affect what the job involves.
- Define the work before comparing estimates. Basic winterization may focus on draining the water system and protecting plumbing. A broader scope can include connected appliances, outdoor showers, and low-point drains. List the tasks your RV needs, then compare estimates against that same list. Otherwise, one estimate may cover fewer steps than another, making the totals difficult to compare fairly.
- Describe your RV accurately when requesting a quote. Share the make, model, and water-system details, including whether it has a water-heater bypass. Mention unusual plumbing access or appliances connected to water. These details help define the work involved. The price depends on the RV and service scope, and is provided after a quote request. Relevant factors include plumbing layout, access, and the tasks required.
- Ask what the service scope covers. Use a written checklist to compare whether the process includes draining tanks, clearing plumbing, protecting appliances, and addressing outdoor connections. For example, an estimate covering interior faucets may not include an outdoor shower. A clear task list helps you understand what each estimate includes and identify work to handle separately.
- Weigh DIY supplies against the work required. Supplies alone don’t account for the time, tools, or equipment needed to complete the steps. Some RVs lack the bypass valves and pumps needed for home winterization. Consider whether your RV’s system and available equipment make the process manageable.
- Consider the cost of leaving plumbing exposed. Water left in tanks or pipes can freeze, crack components, and cause leaks after thawing. Damage may affect pipes inside cabinets or beneath sinks, where leaks can reach the RV interior. Compare the winterization work with the potential repair burden, rather than treating the lowest immediate expense as the only factor.
- Plan the quote request before cold weather arrives. Provide your RV details and required tasks together so the requested scope is clear. If your plumbing system has a water heater, bypass, or unusual appliance connections, include those specifics. Then compare estimates using the same winterization checklist. This makes costs easier to understand and helps you plan the work before storage.
Pahrump Rentals & Hardware: Industrial Equipment Rentals
Pahrump Rentals & Hardware offers Industrial Equipment Rentals, Tool Rentals, and Professional Hardware Solutions for local projects. Tool rentals can support tasks that require equipment you don’t own, while hardware solutions can help with broader project needs. These offerings may be useful when preparing a storage area or organizing equipment for winter storage, but they don’t replace the RV-specific plumbing steps in the owner’s manual. Contractors can also use the Contractor Portal, a dedicated online resource. Contact Pahrump Rentals & Hardware to discuss your project needs.
Make your winter storage plan now
Use the weeks before storage to decide which preparation tasks you’ll handle yourself and which need experienced help. A clear plan keeps supplies, equipment, and the RV owner’s manual together, so you can work through each task before the first cold night. If your RV’s system is unfamiliar, Pahrump Rentals & Hardware’s RV repair service can support seasonal maintenance and repair needs.
Pahrump Rentals & Hardware offers RV Repair and RV supplies in Pahrump, supporting owners preparing for storage and addressing maintenance needs. If the RV also needs tools or equipment for related project work, the business offers Tool Rentals and Industrial Equipment Rentals, along with Professional Hardware Solutions. For RV-specific winterization, follow the manufacturer’s instructions and describe the work needed when arranging professional help.
Take the next step with a plan that fits your RV and storage needs. Contact Pahrump Rentals & Hardware to discuss equipment and hardware for your project. A thoughtful preparation plan can help you store your RV with greater confidence and be ready for the next season.
Frequently Asked Questions
When should I winterize my RV?
Winterize before overnight temperatures consistently reach 32°F or below. In Pahrump, use the forecast for the RV’s storage location, not just daytime weather or conditions at home. If you move the RV between Pahrump, Beaty, Goldfield, or Tonopah, check the forecast at its next parking spot. A location-specific plan helps you avoid leaving water in the system during a freeze.
How Do You Blow Out the Water Lines?
Follow your RV manual’s sequence and use an air compressor set to no more than 50 PSI. Drain the system first, then connect the compressor using the appropriate RV blowout connection. Open each hot and cold faucet in turn, including the shower and toilet supply. Check the manual for other water outlets on your model, since an overlooked branch can retain water after visible faucets are clear.
How Do You Drain the Water System First?
Disconnect the RV from its water supply and switch off the water pump before draining. Use the manual to locate the freshwater tank drain and plumbing low-point drains, then open faucets to help water leave the lines. Empty the holding tanks using the RV’s normal procedure. Check the water-heater instructions for its drain method, and finish draining before beginning the remaining winterization steps.
How does location affect winterizing timing?
The RV’s parking location matters because overnight temperatures can differ between where you live, travel, and store it. Check the forecast for the actual site in Pahrump, Beaty, Goldfield, or Tonopah, and plan around the coldest expected nights there. An RV parked outdoors may face different conditions from one in a protected space. Use the location-specific forecast instead of relying on a regional average.
Is Blowing Out Lines Better Than Antifreeze?
Neither method is best for every RV. Compressed air can clear plumbing without filling lines with antifreeze, but overlooked low points may still hold water. RV-specific antifreeze protects plumbing by moving through the system, while the water heater must be bypassed first. Your RV’s plumbing design, manual, and available equipment determine which method suits it. Follow the manufacturer’s procedure, including any instructions to combine methods.
Which RV service centers in Pahrump, Nevada offer winterization?
Pahrump Rentals & Hardware offers RV Repair and RV supplies in Pahrump. RV repair can help with maintenance or repair needs related to seasonal preparation, while supplies support owners getting ready for storage. For RV winterization in Pahrump, the business serves owners whose preparation also involves RV repair or supplies. Owners outside Pahrump can contact the business to ask about availability.
What RV winterization services are included in Pahrump?
Winterization prepares the water system for storage by draining water, protecting plumbing, and addressing connected water appliances. The tasks depend on the RV’s layout and the work required. Pahrump Rentals & Hardware offers RV Repair and RV supplies for owners handling seasonal maintenance. For RV winterization in Pahrump, describe your RV and the preparation tasks needed when discussing the work.
How much does RV winterization cost in Pahrump?
The price depends on the RV and service scope, and is provided after a quote request. Plumbing layout, access, and connected appliances affect the work involved. For RV winterization in Pahrump, describe your RV and list the tasks you need so estimates can be compared on similar work. A system with difficult-to-reach plumbing may require a different scope from a straightforward layout.


