
You plug into shore power, but the outlets stay dark while the RV lights still work. It’s easy to assume the whole electrical system has failed, but troubleshooting common RV electrical problems starts by identifying which system is affected. RVs rely on both 12-volt DC power for items such as lights and water pumps, and 120-volt AC power for outlets and larger appliances. A symptom in one system doesn’t automatically point to a fault in the other.
If you’re unsure what’s safe to check, start with observations rather than opening panels or replacing parts. This guide explains how to distinguish common 12-volt and 120-volt symptoms, work through basic checks in a safe order, and recognize warning signs that call for professional attention.
You’ll also learn what details to record, including which devices are affected and what changed before the issue began. Those notes can help when arranging RV repair. For owners and travelers in Pahrump, Beaty, Goldfield, and Tonopah, careful first checks and professional repair support can help you take a clear next step without guessing at the cause.
Key Takeaways
- Start by listing what works and what doesn’t, then narrow down which electrical system may be involved.
- A step-by-step approach to troubleshooting common RV electrical problems helps you gather useful information without jumping to component replacement.
- Symptoms can point to possible electrical faults, but they don’t confirm that a particular part has failed.
- Keep checks to low-risk visual observations, and stop if the next step involves electrical testing or repairs you’re not equipped to perform safely.
- For a repair visit, note the RV’s make and model, warning indicators, when the issue began, and any recent changes.
Troubleshooting Common RV Electrical Problems: Start With the Symptoms
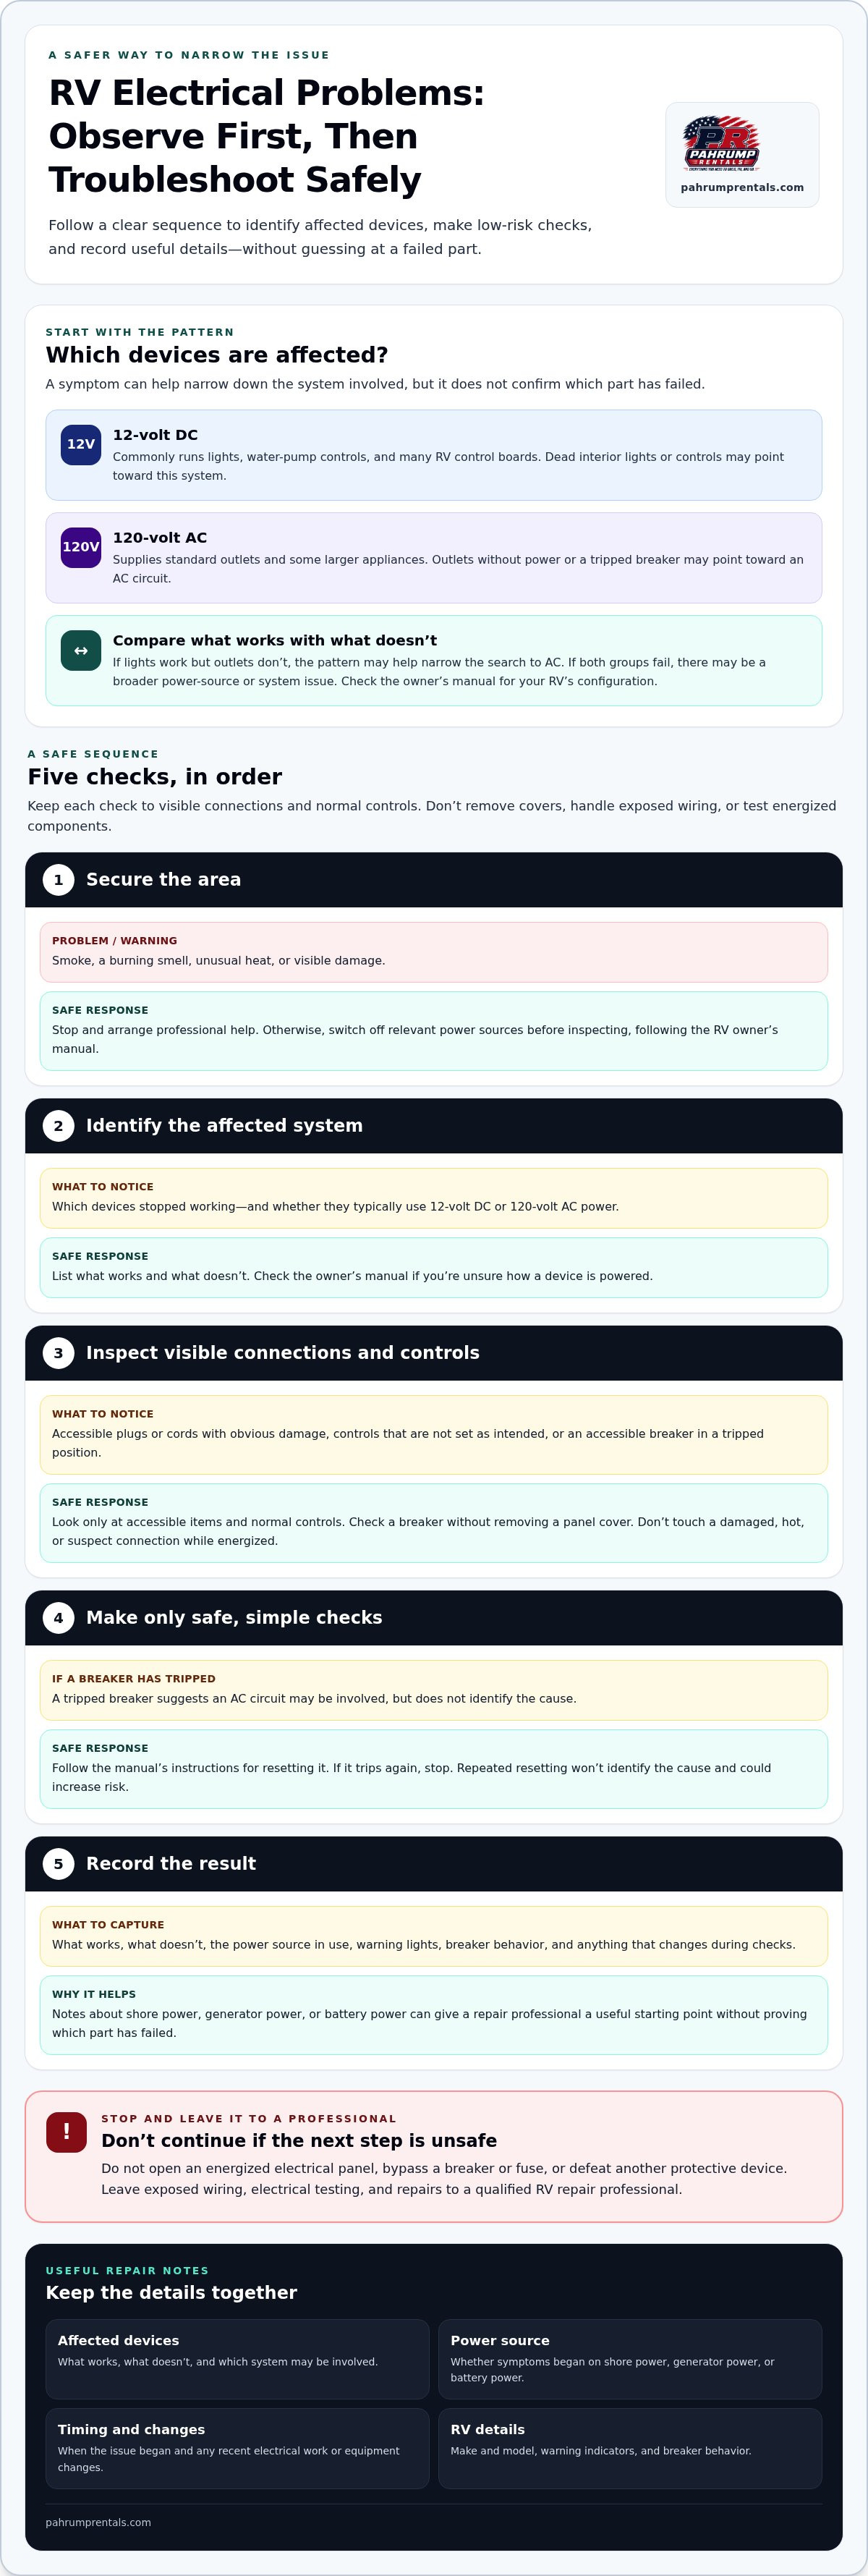
Before replacing a fuse or resetting a breaker, identify which part of the RV’s electrical system appears to be affected. Trace the symptoms one step at a time: list what works, what doesn’t, and whether the issue began after connecting to shore power, starting the generator, or changing another power source. These clues can narrow down the system involved without assuming a component has failed.
RVs commonly use two electrical systems: 12-volt direct current (DC) and 120-volt alternating current (AC). In an RV, the 12-volt DC system typically runs lights and controls, while the 120-volt AC system supplies standard outlets and some larger appliances. This distinction is a useful starting point, although an appliance’s exact power needs depend on the RV’s equipment and setup.
- Interior lights or control panels are dead: This may point to the 12-volt DC system, especially if several lights or controls stop working together.
- Outlets have no power: This often points to the 120-volt AC system. Note whether all outlets are affected or only those in one area.
- A breaker has tripped: This suggests an AC circuit may be involved. A blown fuse, by contrast, may affect a DC circuit.
- Battery-powered equipment seems weak: Dimming lights or sluggish controls can suggest a battery or charging issue, but symptoms alone don’t confirm the cause.
How to tell whether an RV problem is AC or DC
Compare the devices affected. Ceiling lights, water-pump controls, and many RV control boards commonly use 12-volt DC power. Wall outlets and appliances such as a microwave or air conditioner may rely on 120-volt AC power, depending on the RV and how it’s powered. If lights work but outlets don’t, the pattern may help narrow the search to AC. If both groups fail, there may be a broader power-source or system issue. Use the owner’s manual to confirm how your RV is configured.
Safety checks before troubleshooting RV electrical problems
Stop if you smell burning, see smoke, notice unusual heat, or find damaged wiring. Don’t touch the affected area or try to restore power; arrange professional help. Before a basic visual check, switch off relevant power sources, such as shore power and the generator when applicable. Follow your owner’s manual for the correct procedure. Never open an energized electrical panel, bypass a breaker or fuse, or defeat another protective device. If the next step involves exposed wiring or electrical testing, leave it to a qualified RV repair professional.
A Safe Step-by-Step RV Electrical Troubleshooting Process
A consistent sequence keeps checks focused and gives you useful information if the fault needs professional attention. Limit troubleshooting to visible connections and normal controls. Don’t remove covers, handle exposed wiring, or test energized electrical components.
- Secure the area. If there’s smoke, a burning smell, unusual heat, or visible damage, stop and arrange professional help. Otherwise, switch off relevant power sources before inspecting connections or equipment, following the RV owner’s manual.
- Identify the affected system. Note which devices have stopped working and whether they typically use 12-volt DC or 120-volt AC power. Check the manual if you’re unsure.
- Inspect visible connections and controls. Look at accessible plugs and cords for obvious damage, and confirm normal switches and RV controls are set as intended. Check accessible breakers for a tripped position without removing a panel cover.
- Make only safe, simple checks. If a breaker has tripped, follow the manual’s instructions for resetting it. If it trips again, stop. Repeated resetting won’t identify the cause and could increase risk.
- Record the result. Write down what works, what doesn’t, the power source in use, and anything that changes during your checks.
Check the power source and visible connections
For shore power, observe whether the campground pedestal appears to be supplying power and whether the RV’s external connection is fully seated and visibly intact. Don’t touch or disconnect a damaged, hot, or suspect connection while it’s energized. On generator power, note whether the generator is running normally and whether the RV’s relevant controls are set as described in the manual. On battery power, visually inspect accessible terminals for signs of looseness or corrosion. Don’t handle terminals or attempt repairs if you’re unsure how to do so safely.
Keep the check limited to what you can see and operate normally. A plug that looks intact, for example, doesn’t prove that power is reaching the affected circuit. Avoid opening covers or using a meter on live equipment to pursue a diagnosis. Shore power sources can also experience transient surges and poor power quality, which industry specialists such as Energy Control Systems note can trigger protective devices or disrupt downstream electronics.
Record what changes when power sources change
If it’s safe and consistent with your RV’s instructions, note whether the same devices behave differently on shore power, generator power, or battery power. A problem that appears only with one source may help a repair professional narrow down the affected circuit or charging path, but it doesn’t prove which part has failed. Record warning lights, breaker behavior, when symptoms began, and any recent electrical work or equipment changes.
These notes make troubleshooting common RV electrical problems more organized and give a repair team a useful starting point. Pahrump Rentals & Hardware provides RV repair for owners and travelers in the area. Bring your observations and the RV’s make and model so the team can understand the symptoms you’ve seen.
Common RV Electrical Problems and What Their Symptoms May Mean
Use the pattern of the fault to narrow down what deserves attention, not to declare a component bad. One electrical symptom can have several possible causes, so it should guide safe checks rather than serve as proof of a failed part. Note whether the problem affects one device, several items on one circuit, or both AC and DC equipment. That distinction makes troubleshooting common RV electrical problems more useful and helps a repair professional understand what you’ve observed.
| Symptom | Possible system or causes | Safe first check | Stop and arrange repair if |
|---|---|---|---|
| Lights or several 12-volt accessories are out | DC supply, battery state, an accessible connection, or a relevant switch | Check normal switches and controls. Visually inspect accessible battery connections only if safe. | Wiring is hot, damaged, difficult to reach, or multiple devices flicker or dim. |
| One outlet has no power | A local outlet issue or an AC circuit interruption | Check whether nearby outlets work and look for a visibly tripped breaker or accessible GFCI reset button. | A breaker trips again, the outlet looks damaged, or there’s a burning smell or heat. |
| Several outlets or AC appliances lose power | Shore power, generator supply, an AC breaker, or a GFCI that also protects other outlets | Note which devices are affected and check the power source and normal RV controls. | The source connection is damaged or the problem continues after safe checks. |
| Battery doesn’t appear to charge | Battery condition, charging path, or the active power source | Record whether the symptom changes on shore power or generator power; check for visible warning indicators. | Connections are damaged, the battery area appears unsafe, or the fault persists. |
| A breaker trips repeatedly | An overloaded circuit or another fault that needs diagnosis | Stop resetting it and note what was operating when it tripped. | It trips again or you can’t safely identify the affected circuit. |
When RV lights or 12-volt accessories stop working
If one light is out, its switch or the individual fixture may be involved. If several lights, controls, or accessories dim or flicker together, record which items are affected and consider the battery supply and visible, accessible connections as possible check areas. Don’t assume the battery is the cause. Stop DIY checks if wiring feels hot, looks damaged, or is difficult to access.
When RV outlets or AC appliances lose power
First note whether the outage affects one outlet or several, then observe whether other AC appliances work. A shore-power connection, generator supply, breaker, or GFCI may be involved; a GFCI can sometimes affect more than one outlet. Check only accessible controls and reset points as directed by the owner’s manual. Don’t open panels or test exposed live wiring. If a breaker trips again, leave it off and arrange professional diagnosis.
These patterns help organize the next step without turning a symptom into a guess. Keep your notes for repair support.
Which RV Electrical Checks Can You Do Yourself, and When Should You Stop?
Safe owner checks are mostly visual: review the manual, confirm normal controls are set correctly, and note what you can see without opening equipment. Electrical testing and repairs are different. RV wiring and equipment vary by model, so a procedure that suits one unit may not be safe for another. During troubleshooting common RV electrical problems, use your manual as the guide and stop when a check moves beyond your training or involves exposed wiring.
Pahrump’s desert heat makes practical trip preparation important. Before traveling, review your RV’s operating guidance and note any electrical concerns. Heat alone doesn’t prove that an electrical fault exists, so treat symptoms as observations rather than assumptions about the cause.
Basic RV electrical checks owners can make safely
Start with the owner’s manual, then confirm that relevant switches and power controls are in the intended position. You can visually inspect accessible cords and plugs for cuts, discoloration, or other visible damage, but don’t touch exposed conductors or handle a damaged connection while it’s energized. Keep the inspection external. Don’t remove covers to reach wiring or components.
Context can help make a repair assessment more efficient. Record whether the RV recently experienced weather exposure, sat in storage, or had new equipment connected. Note when the symptom appeared and whether it affects one device or several. These details don’t establish the cause, but they help describe the fault clearly.
When professional RV electrical repair is the safer choice
Stop and arrange professional assessment if you smell burning, see smoke, find damaged wiring, notice unexplained heat, or a breaker trips repeatedly. Don’t keep resetting a breaker to restore power. Internal panel work and live-circuit testing aren’t basic visual checks. Leave those tasks to qualified service personnel, and don’t bypass breakers, fuses, or other protective devices.
A slide-out that stops moving or behaves inconsistently may involve electrical components, but the symptom alone can’t identify the cause. Avoid reaching into its mechanism or attempting wiring repairs. Record what happens when you use the normal control, then describe the symptom along with any warning indicators or recent changes when arranging service.
If the next step would require opening a panel, testing a live circuit, or working around wiring you can’t safely access, stop there. Pahrump Rentals & Hardware provides RV repair for local owners and travelers. Arrange RV repair in Pahrump when safe visual checks don’t resolve the concern, and bring your notes and owner’s manual if available.
Getting RV Electrical Problems Repaired in Pahrump
If safe visual checks haven’t resolved the issue, local RV repair is a practical next step. Clear notes can help the repair team understand what you’ve observed and provide a useful starting point. You don’t need to diagnose the fault yourself. Describe the symptoms accurately, and avoid presenting a suspected cause as a confirmed failure.
How to prepare for an RV electrical repair visit
Before arranging service, gather the details that help describe the RV and the problem. A short written summary is often more useful than trying to remember each detail later. Include:
- The RV’s make, model, and, if available, year.
- Which lights, outlets, appliances, controls, or other equipment are affected, and which still work.
- When the symptoms began and whether they are constant or intermittent.
- Whether the symptoms change on shore power, generator power, or battery operation.
- Any warning indicators, breaker behavior, or unusual sounds or smells you observed.
- Recent changes, such as a period in storage, weather exposure, new equipment, or previous repairs or modifications.
Bring the owner’s manual if it’s available. It can help identify how your RV’s equipment and controls are configured. If you’ve already made safe checks, note what you checked and what changed afterward. Don’t repeat a step that caused a breaker to trip, produced heat, or revealed damaged wiring. Share that observation instead.
What to expect when seeking local RV repair
Explaining the symptom pattern gives the repair team context before work begins. For example, say whether one outlet is affected or several, whether lights dim across the RV, and whether the issue occurs with a particular power source. This information helps frame the concern without assuming a specific component or repair method. RV systems vary, so the next steps depend on the unit and the fault found.
Pahrump Rentals & Hardware provides RV repair for local owners and travelers in Pahrump, Beaty, Goldfield, and Tonopah. If the reported issue relates to equipment or parts you recently added, include that detail and any product information you have. RV supplies may be relevant to a repair, but the reported symptoms and RV details remain the best place to begin.
Careful notes are a useful handoff from your initial troubleshooting to professional support. If electrical symptoms remain unresolved or you’ve reached the limit of safe checks, arrange RV repair support in Pahrump.
Keep Your Next Trip Moving With a Clear Plan
A small electrical symptom doesn’t have to leave you guessing. Treat troubleshooting common RV electrical problems as a way to make informed decisions, not a reason to take on repairs that feel beyond your experience. If a concern persists, the observations you’ve gathered can help turn uncertainty into a clear starting point for service.
Pahrump Rentals & Hardware is a local resource for the community, offering professional RV repair and RV supplies for owners and travelers. Whether you need help addressing an unresolved fault or supplies related to your RV, a clear description of the issue helps move the conversation forward.
Keep your notes and owner’s manual close, and choose the next step that feels safe for you and your RV. For local support, arrange RV repair support in Pahrump. With a careful approach and knowledgeable help when needed, you can get back to planning the road ahead with greater confidence.
Frequently Asked Questions
Why does my RV have power to the lights but not the outlets?
Lights may work because they use the RV’s 12-volt DC system, while outlets typically rely on 120-volt AC power. The outlet issue could involve a tripped breaker, a GFCI outlet, or the shore power or generator supply. Check whether one outlet or several are affected, and whether nearby outlets work. If you’re in Pahrump or traveling nearby, note the pattern before arranging RV repair.
Can I troubleshoot RV electrical problems while plugged into shore power?
You can observe normal controls and note which devices work, but don’t handle damaged plugs, exposed conductors, or open an energized panel. Before inspecting a shore-power connection, disconnect power according to your RV manual and avoid touching anything hot or damaged. If you’re unsure how to disconnect safely, stop and seek qualified help. A clear record of symptoms is useful without performing live electrical tests.
What causes an RV battery to stop charging?
A battery that isn’t charging may involve the battery itself, the charging equipment, a connection, or the power source supplying the charger. A battery disconnect switch or other control may also affect operation, depending on the RV. Note whether the charge changes when the RV is connected to shore power or running its generator. Avoid testing terminals or replacing parts without guidance from the owner’s manual or a repair professional.
Why does my RV breaker keep tripping?
A breaker may trip because a circuit is overloaded or because an appliance, connection, or circuit has a fault. Note what was running just before it tripped, such as multiple appliances used at once. Don’t keep resetting the breaker if it trips again, and don’t substitute a different breaker or bypass it. Repeated trips need professional assessment, especially if you notice unusual heat, a burning smell, or visible damage.
Is it safe to use a generator if my RV outlets are not working?
Not as a workaround until you understand why the outlets have lost power. If the fault is in an RV circuit, switching to generator power may not resolve it, and repeated attempts could leave the underlying issue unaddressed. Follow the generator and RV manuals, and don’t operate equipment that shows damage, heat, or unusual behavior. Record whether the outlet symptoms change with the generator, then arrange repair if they persist.
When should I take my RV to a repair shop for an electrical problem?
Arrange professional RV repair if you find damaged wiring, smell burning, see smoke, notice unexplained heat, or a breaker trips repeatedly. Stop sooner if a check would require opening a panel or testing live wiring. Write down the affected equipment, warning indicators, and recent changes. Pahrump Rentals & Hardware provides RV repair for local owners and travelers in Pahrump, Beaty, Goldfield, and Tonopah.
Can hot weather cause RV electrical problems?
Hot weather can be a factor to mention, but it doesn’t identify the cause of an electrical symptom by itself. Record whether an issue appeared after the RV had been sitting in the heat, and note any warning lights, unusual smells, or changes in equipment behavior. Don’t touch a connection that feels hot. Once conditions are safe, consult your manual and share these observations when arranging repair in the Pahrump area.


