

The biggest DIY setbacks often begin before the first cut, drill, or repair. An unclear project scope, an overlooked site condition, or a tool that doesn’t suit the task can lead to delays and repeat work. Avoiding common DIY project mistakes starts with careful preparation, not simply working faster.
It’s easy to focus on the finished result and underestimate the steps needed to get there. A realistic plan helps you define the work, sequence each stage, and account for materials, time, and safety before you begin. Choosing suitable tools and materials also makes the job more manageable and reduces the temptation to rely on workarounds.
This guide explains how to set a clear project scope, prepare your workspace, and choose task-appropriate tools and materials. It also covers checking for hidden conditions, recognizing when a job may be beyond your skills, and working safely. Whether you’re preparing a project in Pahrump, Beaty, Goldfield, or Tonopah, a deliberate approach can help you make informed decisions and avoid preventable rework.
Key Takeaways
- Define the project scope, finish criteria, limits, and work sequence before buying supplies.
- Match tools and materials to the task, work area, and your experience. Consider renting specialized tools you’ll use infrequently.
- A DIY project may save on labor, but mismeasurement, rushed purchases, and rework can undermine those savings.
- Make avoiding common DIY project mistakes part of a repeatable routine: prepare the area, follow instructions, use suitable protection, work in sequence, and inspect as you go.
- Before wrapping up, check function and finish, clean the area, store tools safely, and record useful product details or maintenance reminders.
Avoiding Common DIY Project Mistakes Starts With a Clear Plan
Even a manageable home project can become frustrating when basic preparation gets skipped. A clear plan helps you spot missing steps before you buy supplies or open up a wall. Home improvement can include everything from routine repairs to larger upgrades, as outlined in this overview of home improvement projects. Start by deciding exactly what your project needs to accomplish.
A useful project scope is a written description of the work, the result you expect, and the limits you won’t cross without reassessing. Define what “finished” means, such as a repaired surface that’s ready for painting, and separate that required outcome from optional upgrades. Extras can add steps, materials, and complexity, so decide whether they belong in this project or a later one.
How do you define a realistic DIY project scope?
List the tasks in order and note which depend on earlier work. For example, prepare the surface before painting, then complete cleanup and inspection after the final coat has dried according to its instructions. Set limits before demolition or installation: concealed damage, unfamiliar systems, or unexpected site conditions are reasons to stop and reassess, not push ahead blindly. Leave room in your sequence to address surprises safely.
Before buying supplies, check measurements, existing conditions, and access at the work site. Confirm that materials can reach the area and that tools can be positioned safely. Plan where removed material and packaging will go, too. For outdoor work in Pahrump, Beaty, Goldfield, or Tonopah, consider the conditions on your project day, including heat, dust, and sun exposure. These can affect when and how you prepare and work.
What should you check at the project site first?
Measure the work area and verify dimensions at more than one point if surfaces or openings may be uneven. Look for visible damage, obstacles, and nearby systems that could affect the work. If the project involves digging, check current Nevada 811 guidance and local requirements before you start. Don’t rely on assumptions about what may be underground.
Use this concise pre-start checklist to turn your plan into practical steps:
- Write down the required outcome and what counts as complete.
- Separate essential work from optional upgrades.
- Measure the area and check access, existing conditions, and waste removal.
- Put tasks in sequence and identify dependencies.
- Set a stop point for concealed damage or unfamiliar conditions.
- Review weather exposure and, before digging, current Nevada 811 guidance and local requirements.
This preparation is the foundation of avoiding common DIY project mistakes. Once the scope and site are clear, you can make better decisions about the tools and materials the job requires.
Avoiding DIY Mistakes Means Matching Tools and Materials to the Job
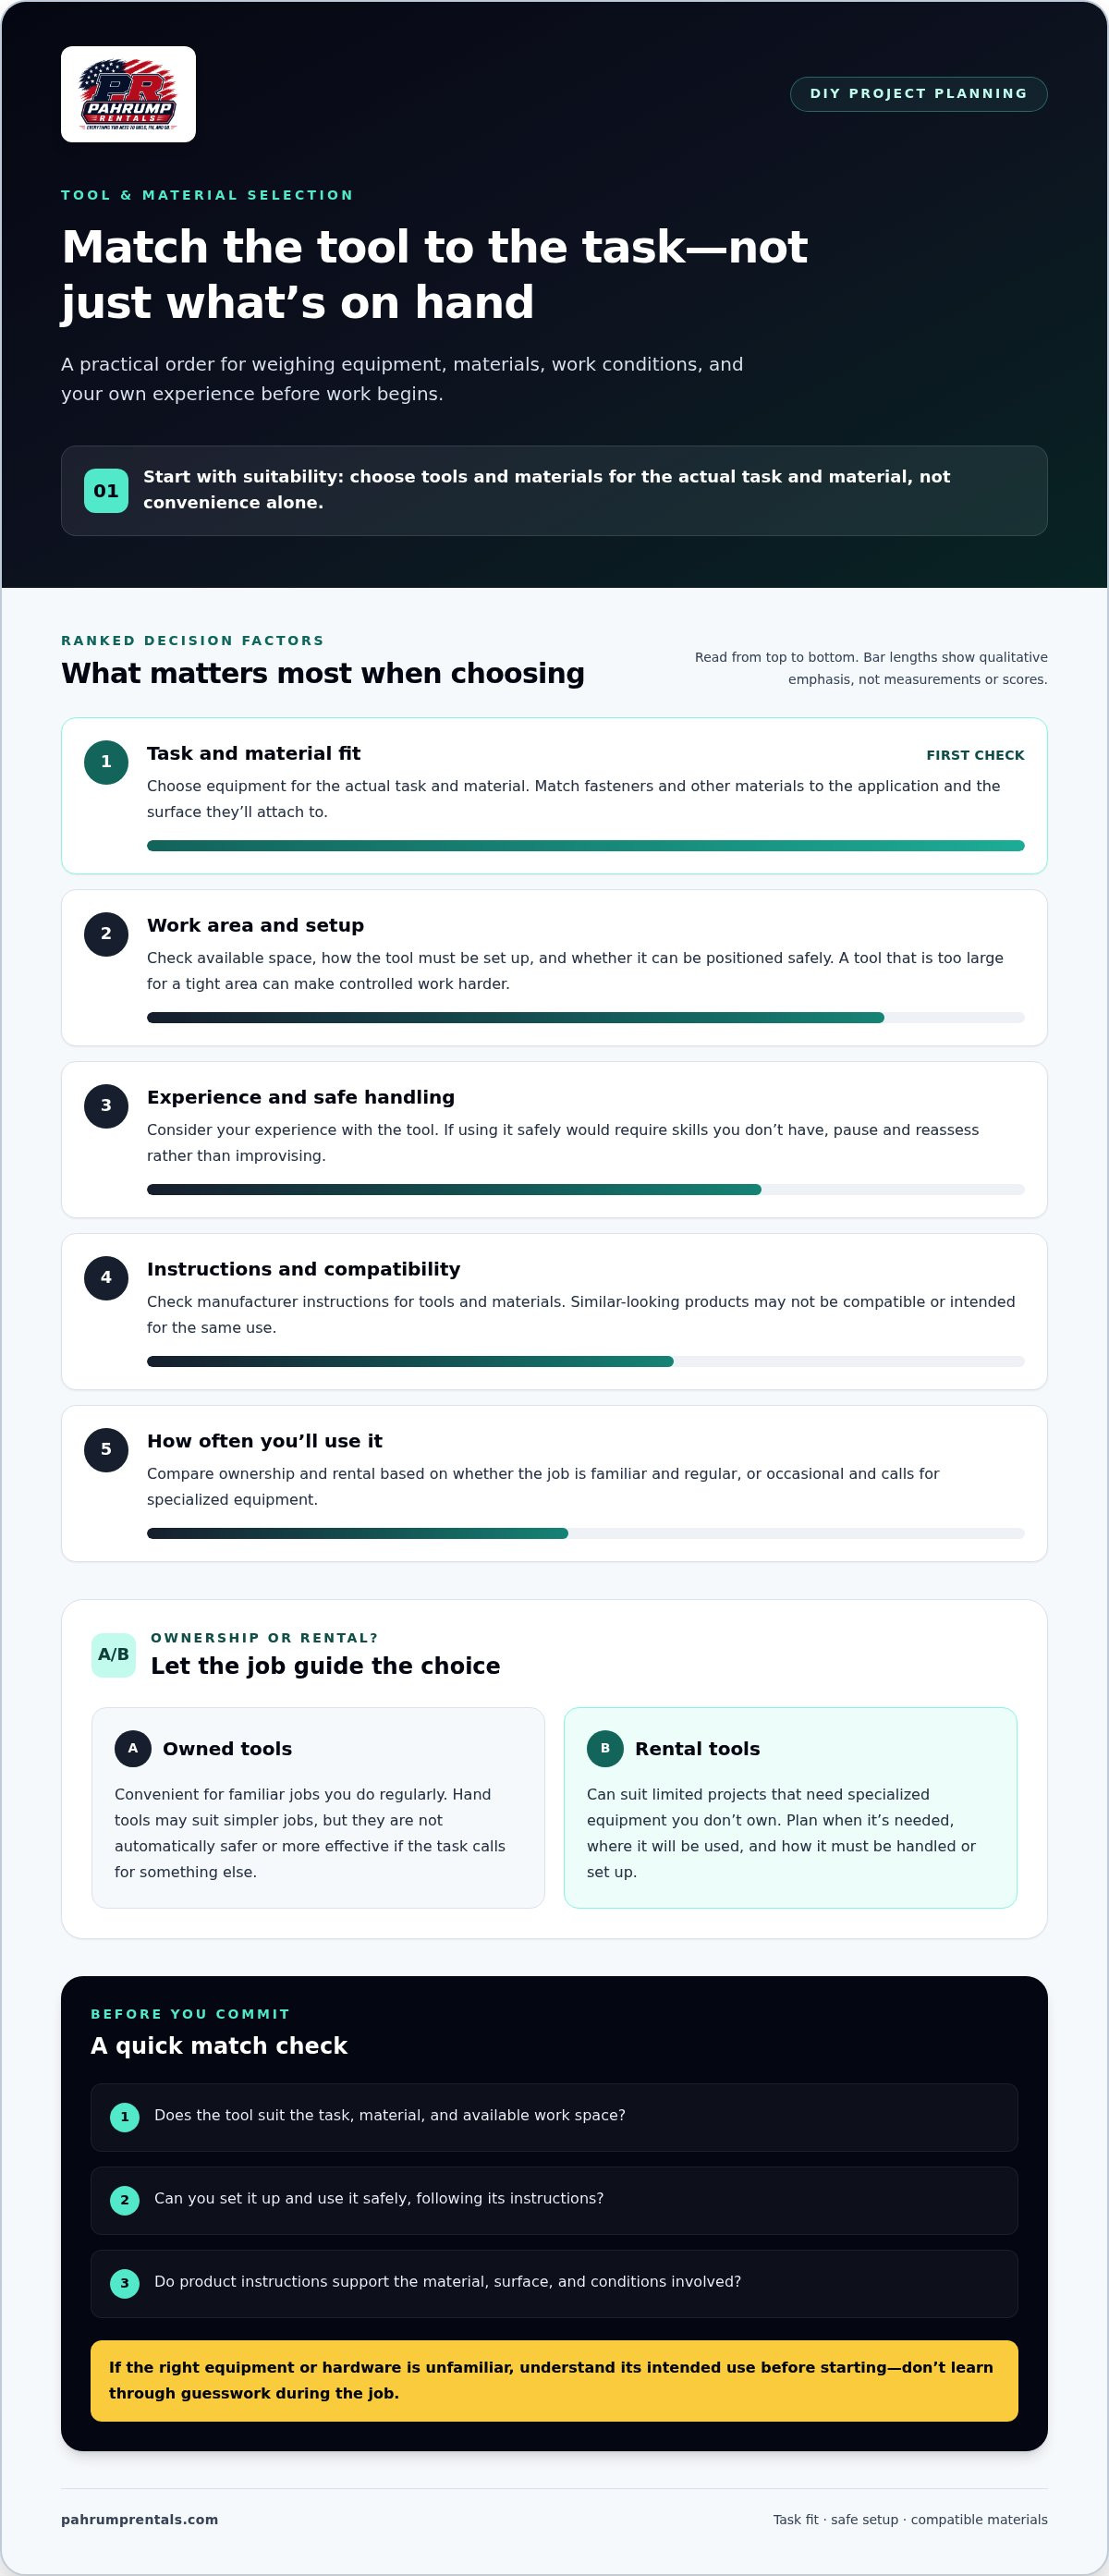
The right tool depends on more than the task name. Consider the material you’re working with, the space available, how the tool needs to be set up, and your experience using it. A tool that’s too large for a tight work area or unfamiliar to you can make controlled, accurate work harder. If using it safely would require skills you don’t have, pause and reassess rather than improvising.
Choose equipment for the actual task and material, not convenience alone. A hand tool may suit a small, straightforward repair, while specialized equipment may be a better fit for a demanding task or material. Check the manufacturer’s instructions for both tools and materials. Similar-looking products aren’t necessarily compatible or intended for the same use.
When should you rent a tool instead of improvising?
Renting can make sense for specialized equipment you’ll use for a limited project. Before arranging a rental, identify when the tool is needed in your work sequence, where you’ll use it, and how it must be handled or set up. Don’t replace the right equipment with an unsuitable tool simply because it’s already on hand. If your project calls for specialized equipment, include equipment rental in Pahrump in your preparation.
Owned tools are convenient for familiar jobs you do regularly, while rentals can suit occasional tasks that call for equipment you don’t own. Hand tools may work well for simpler jobs, but they aren’t automatically safer or more effective if the task requires something else. Compare options by suitability, setup needs, and how often you expect to use them. Make sure you understand the tool’s instructions before starting.
How can the wrong materials create avoidable rework?
Fasteners and other materials need to suit the application, the surface they’ll attach to, and the conditions they’ll face. Check manufacturer guidance for the substrate and exposure, especially for outdoor work. Don’t substitute a product based only on its appearance or combine materials unless their instructions support that use. A mismatch can affect how well an assembly performs and may mean taking work apart to correct it.
Before buying, compare the task requirements with the product instructions and the tools you can use properly. If the right equipment or hardware is unfamiliar, take time to understand its intended use instead of learning through guesswork during the job. Pahrump Rentals & Hardware offers professional hardware, fasteners, and tool rentals to support task-specific preparation. Careful matching is a practical part of avoiding common DIY project mistakes.
Is DIY Always Cheaper? Avoid Mistakes That Create Rework
Doing a project yourself can reduce labor costs, but that doesn’t guarantee less total effort or expense. Your time, supplies, tool needs, and any corrections all affect the trade-off. A careful DIY job may be worthwhile when the work fits your skills and you can follow the product instructions. Rushed work can erode the expected savings if you need to replace materials or undo completed steps.
Planned DIY is work you can carry out safely and according to the required instructions. If a task exceeds your training or safe capability, pause rather than guess. Stopping to reassess can prevent a manageable project from turning into a larger repair, especially when the work involves systems or hazards you don’t understand.
Which DIY shortcuts commonly lead to repeat work?
Skipping measurements, ignoring product instructions, or fastening components before checking their fit can create avoidable corrections. A small measurement error may affect later cuts or alignment. A rushed purchase can leave you with a material that doesn’t suit the application, while an unsuitable tool may make precise work harder. These problems can compound: a mismatch discovered late may mean removing work, replacing materials, and repeating earlier steps.
Slow down before making an irreversible cut, drilling a hole, or fastening parts in place. Where a dry fit is appropriate, position components without permanently attaching them so you can check alignment and clearances first. Record measurements and decisions in one place, and refer to product instructions as you work. This simple record helps prevent guesswork if you need to pause or revisit a step.
When is it sensible to pause a DIY project?
Unexpected structural damage, unfamiliar electrical or gas work, or any uncertain safety condition should trigger a stop. Don’t cover damage, proceed with a system you don’t understand, or treat an online example as proof that your situation is safe. Pause, keep the area undisturbed where appropriate, and identify what information or expertise is needed before work continues.
DIY gives you control over timing and an opportunity to build practical skills, but it also puts planning, execution, and quality checks in your hands. Compare that benefit with the task’s difficulty, the consequences of an error, and whether you have the right tools and knowledge. Avoiding common DIY project mistakes doesn’t mean avoiding every challenge. It means recognizing when careful progress is reasonable and when continuing would be a guess.
Avoid Common DIY Safety and Execution Mistakes With a Repeatable Process
A steady routine makes it easier to work carefully and notice problems before they spread. General safety reminders are a starting point, not a substitute for task-specific instructions or the tool manufacturer’s guidance. Follow the instructions for the materials and equipment you’re using, and check current official guidance where a task is regulated or has specific safety requirements.
Before switching on a tool, clear the work area, secure materials, keep people and pets out of the work zone, put on task-appropriate protective equipment, and review the tool’s instructions. Set up first, then follow this repeatable process:
- Prepare the area. Remove clutter, make sure materials are stable, and keep your work zone clear of people who could enter unexpectedly.
- Review instructions. Read the project steps and manufacturer guidance for tools and materials before use. Don’t rely on a general tip if it conflicts with product instructions.
- Use suitable protection. Choose protective equipment for the task and follow its instructions. Stop if you’re unsure what protection or setup is needed.
- Work in sequence. Complete steps in the planned order, allowing each stage to meet its instructions before moving on.
- Inspect as you go. Check the work at useful milestones, not just at the end.
What safety checks should happen before work begins?
Arrange the work area, materials, and tools so you can work without unstable setups or avoidable obstacles. Consider who else may be nearby and keep them clear of the active zone. For unfamiliar or regulated work, don’t guess about safe procedures. Pause and consult qualified help before proceeding.
How can you catch mistakes before they become rework?
Build short checks into the process. After measuring or positioning components, verify alignment and fit before cutting, drilling, or fastening. At later stages, check fasteners and completed work against the product instructions and your project plan. Catching a mismatch before the next step can prevent it from affecting the rest of the job.
If the site or materials differ from what you planned for, stop and reassess. Don’t force a tool or product to work under conditions its instructions don’t support. A pause can be the safest and most practical next step.
Careful setup depends on having equipment suited to the task. Pahrump Rentals & Hardware offers tool and equipment rentals to help you plan for the work ahead.
Finish DIY Projects Strongly With a Final Check and the Right Local Tools
Finishing well means more than putting away the last tool. A final review helps you confirm that the result matches your original scope, identify unfinished concerns, and leave the area safe for everyday use. It also gives you a useful record for future repairs instead of relying on memory.
What should you inspect before calling a DIY project complete?
Compare the finished work with your plan and the relevant product instructions. Test function only in ways appropriate to the task and described by the manufacturer. Don’t improvise a test if you’re unsure how to do it safely. If something doesn’t work as expected or you spot a concern, record it and address it before treating the project as complete.
- Function: Confirm the completed work operates as intended using appropriate checks.
- Finish: Look for visible gaps, uneven edges, loose components, or other issues against your project criteria.
- Cleanup: Remove waste and leftover materials from the work area.
- Safe storage: Put tools and materials away according to their instructions.
- Open items: Note incomplete work or concerns. Don’t hide them beneath paint, trim, or other finish materials.
Keep a simple project record, too. Note product details, measurements, materials used, and any maintenance reminders. For example, recording the type of fastener or finish used can make a future repair easier to plan. These notes also help you understand what worked well and what you’d change next time.
How can local rental and hardware resources support the next project?
Task-specific tool access and suitable fasteners can help you prepare with fewer workarounds, though they can’t guarantee a particular result. If your next project calls for specialized equipment, include Pahrump tool rentals in your planning. Contractors can also use contractor registration and rental management to organize rental agreements and project needs.
Careful closeout is part of avoiding common DIY project mistakes. Record lessons from the job, store equipment safely, and note what the next project will require. When you’re ready to plan another task, explore Pahrump Rentals & Hardware’s local tools and equipment.
Put Your Next DIY Project on a Stronger Footing
A reliable result starts before work begins. Define the scope and sequence, check measurements and site conditions, and choose tools and materials suited to the task. As you work, follow product instructions, use appropriate protection, and inspect each stage before moving forward. Knowing when to pause is part of avoiding common DIY project mistakes, especially if conditions change or the work exceeds your experience.
Good preparation doesn’t mean owning every tool. Pahrump Rentals & Hardware supports local projects with industrial equipment and professional-grade tool rentals, plus hardware and fasteners for residential and commercial work. Contractors can also use the portal to manage rental agreements and project needs.
For your next job, start with the requirements, then line up the tools and materials that fit. Explore local tools and equipment for your next project. Take it one step at a time, and give your work a careful finish.
Frequently Asked Questions
What is the most common DIY project mistake?
There isn’t one mistake that applies to every DIY project, but inadequate planning is a recurring source of avoidable problems. An unclear scope can leave out important steps, skipped measurements can lead to poor fit, and an improvised sequence may force you to undo completed work. Before starting a home repair or improvement, write down the intended result, check dimensions, and decide the order of tasks.
How can I avoid making mistakes on my first DIY project?
Choose a manageable task, define the result you want, and check measurements before buying or modifying materials. Review the instructions for both the product and tools, then write a simple task sequence and prepare a clear work area. If conditions differ from your plan, stop and reassess. Beginners should also pause if a task involves unfamiliar hazards or systems they don’t understand.
Is DIY always cheaper than hiring someone?
No. DIY can reduce labor costs, but the total effort depends on preparation, materials, tool needs, and whether errors require correction. A task that seems straightforward may take longer if you need to redo a measurement or replace an unsuitable material. Compare the project’s complexity with your skills, available time, and resources before deciding. Don’t assume that doing the work yourself automatically means a lower overall cost.
What tools should I have before starting a DIY project?
The right tools depend on the task, material, work area, and your experience, so a universal tool list can be misleading. Identify the required equipment from the project steps and manufacturer instructions. Then decide whether suitable tools you own are enough or whether renting specialized equipment makes sense. Include measuring tools and task-appropriate protective equipment in your preparation, and learn how to use each tool before starting.
When should I stop a DIY project and get professional help?
Pause if you uncover unexpected damage, structural concerns, unfamiliar electrical or gas systems, or hazards you can’t assess safely. Don’t guess, improvise, or cover a problem just to keep the project moving. Document what you found and consult qualified help appropriate to the work before proceeding. Recognizing that a task exceeds your experience is a responsible part of project planning, not a failure.
How do I avoid wasting materials on a DIY project?
Confirm measurements and quantities before purchasing, and check product instructions for compatibility with the application and surface. Plan cuts where relevant, and verify fit before permanent installation if the task allows. Keep a record of measurements and decisions so you can refer back to them as work progresses. Requirements vary by project and material, so follow the applicable manufacturer guidance rather than relying on a universal waste estimate.
What should I check before using a rented tool?
Before using a rented tool, make sure it suits the task and material, review its operating instructions, and check that the work area and setup are appropriate. Use protective equipment suited to the job, and plan where the tool fits into your project sequence. Don’t start if anything is unclear or seems unsafe. Pahrump Rentals & Hardware offers tool and equipment rentals to support local project preparation.


