
What if the best tool for your DIY project is one you don’t buy? A useful DIY project tool list Pahrump homeowners can rely on starts with the job itself, not a generic bundle of gear. It’s easy to focus on the saw or drill and miss the fasteners, setup supplies, or safety equipment that keep work moving.
Before gathering tools, define the project, materials, and tasks. Then separate what you already own from what makes sense to purchase or rent, especially if a specialized tool may only be used once. This project-first approach helps you plan confidently and avoid storing equipment you’re unlikely to use again.
In this guide, you’ll build a practical checklist for measuring and layout, cutting and fastening, cleanup, consumables, and personal protective equipment. You’ll also learn how to account for outdoor conditions in Pahrump, Beaty, Goldfield, and Tonopah, when rentals make sense, and why hardware and fasteners belong on the list before the first cut.
Key Takeaways
- Build your DIY project tool list Pahrump around the task, materials, project scale, and your experience rather than a generic checklist.
- Break the work into stages, then sort needs into hand tools, power tools, accessories, consumables, and safety gear.
- Compare owning, buying, or renting based on how often you’ll use a tool, how much space it takes, and how long the project will last.
- Plan supplies, outdoor work conditions, access, and cleanup before starting so your checklist supports the whole project.
- Use one project plan to coordinate tools, equipment rentals, hardware, and fasteners.
DIY Project Tool List for Pahrump: Start With the Job
Match tools to the task, not to an oversized, one-size-fits-all list. A DIY project tool list Pahrump residents can use starts with four details: the type of work, the material, the project’s scale, and the person doing it. A small indoor repair may need only a few hand tools, while an outdoor build or masonry repair can call for different equipment, setup, and safety planning.
A project-first tool checklist is a list of tools and supplies chosen for each step of a specific job, from preparation through cleanup. Keep essential items separate from optional upgrades and specialty tools. Equipment for a single, limited-use job may be a rental candidate rather than a permanent purchase.
How to define the project before gathering tools
Write down what you’re changing or repairing, where the work will happen, what materials you’ll use, and what the finished result should look like. Divide the job into preparation, construction or repair, and cleanup. For example, a repair may require clearing and protecting the area before work, fitting or fastening materials during the repair, and collecting debris afterward. This sequence helps reveal tools and supplies you might otherwise miss.
Be realistic about your experience. Work involving energized wiring, gas lines, major structural changes, or other specialized skills may be beyond casual DIY. Pause and involve a qualified professional when the work requires expertise you don’t have, rather than trying to solve the gap by adding more tools.
Which project details change the tool list?
An indoor repair may depend on room to move, surface protection, and access to the work area. Outdoor work can require a plan for moving equipment across the site and keeping tools and materials organized. In Pahrump and nearby communities such as Beaty, Goldfield, and Tonopah, consider current outdoor conditions, including heat, wind, and dust. Check conditions before starting and choose a safe time and setup for the work.
Material matters, too. Wood projects commonly involve measuring, cutting, and fastening; masonry may call for tools suited to hard surfaces; metalwork needs equipment appropriate to the material and task; and soil work requires tools for digging or shaping. The comprehensive list of tools can help you explore categories, but use it as a reference, not a shopping list. Select only what fits your project, and separate essentials from optional upgrades and single-use specialty equipment.
Build a DIY Tool Checklist by Project Stage
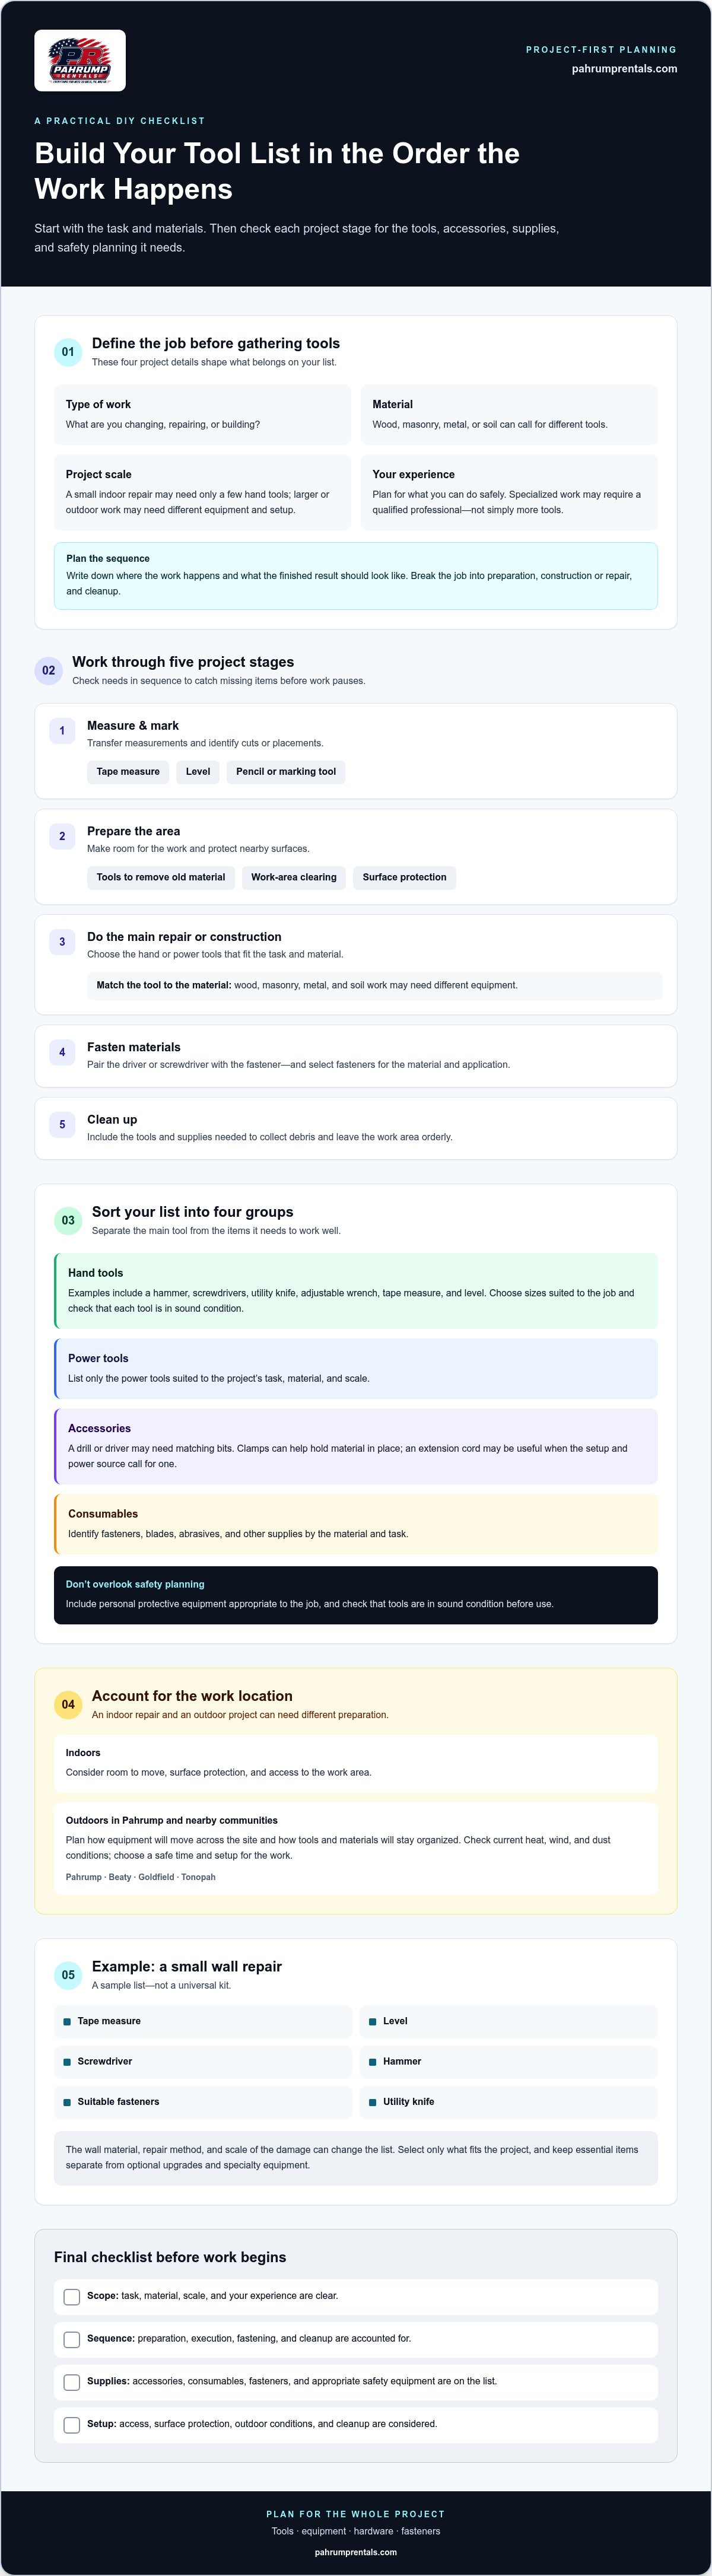
Once the scope is clear, arrange the checklist in the order the work will happen. This makes it easier to spot missing items before a project pauses for a supply run. The materials and scope of a project determine which tools and supplies it requires. A short repair may need a small hand-tool kit, while a larger job can call for power tools, accessories, and equipment suited to the material.
Work through the project stages
- Measuring and marking: List the tape measure, level, pencil, or other marking tool needed to transfer measurements and identify cuts or placements.
- Preparation: Account for tools to remove old material, clear the work area, and protect nearby surfaces.
- Execution: Note the hand or power tools that perform the main repair or construction task.
- Fastening: Match the driver or screwdriver to the fastener, and list the right fasteners for the material and application.
- Cleanup: Include tools and supplies for collecting debris and leaving the work area orderly.
Separate tools from supplies
Sort each stage’s needs into four groups: hand tools, power tools, accessories, and consumables. Core hand tools might include a hammer, screwdrivers, utility knife, adjustable wrench, tape measure, and level. Choose sizes suited to the work, and check that each tool is in sound condition. Give every measuring or marking tool a specific purpose, such as checking a shelf’s level or marking a cut line.
For suitable tasks, a drill or driver may need matching bits. Clamps can help hold material in place, and an extension cord may be useful where the setup and power source call for one. List accessories separately so the main tool doesn’t distract you from what it needs to operate effectively.
Consumables are used up or changed during the job. Identify fasteners, blades, abrasives, and other supplies by material and task. A small wall repair, for example, might call for a tape measure, level, screwdriver, hammer, suitable fasteners, and a utility knife. That sample isn’t a universal kit: the wall material, repair method, and scale of the damage can change the list.
Use this structure to shape a DIY project tool list Pahrump residents can adapt to their own work. For more on planning equipment rentals around a project, read the Pahrump tool rental guide. Pahrump Rentals & Hardware offers tool and equipment rentals, hardware, and fasteners to help local DIYers organize the tools and supplies on their list.
Own, Buy, or Rent: Choose the Practical Tool Option
A tool’s role in your project can help determine whether to keep it, purchase it, or rent it. Think beyond the immediate task: consider how often you’ll use it, how much space it needs, how long the project will take, and whether you’re comfortable operating it safely. This decision framework helps turn a DIY project tool list Pahrump homeowners can act on into a plan that fits both the job and their household.
When owning or buying a tool makes sense
Tools used regularly across different household projects may make sense to own. Common hand tools, for example, can support repeated repairs and routine maintenance. If you’re considering a purchase, weigh likely future use alongside storage space, upkeep, and your familiarity with the tool. A tool that will sit unused or be difficult to store may be less practical to keep, even if it suits today’s project.
Distinguish between an essential tool and an optional upgrade. If a basic tool can complete the task safely and accurately, a more specialized alternative may not be necessary. Base the choice on the work you expect to do over time, not only on today’s checklist.
When a DIY tool rental may be more practical
Specialized, bulky, or occasional-use equipment can be a rental candidate, particularly for a limited project. Before deciding, consider the project duration, how the equipment will be transported to the work area, the space needed to set it up, and whether you can operate it safely. A rental is useful when the equipment fits the task and you’ve planned how to use it responsibly.
Keep accessories and supplies in view, too. The main tool may not be the only item needed to complete the task, so include compatible accessories and relevant consumables in the project plan. For broader planning factors, see the complete equipment rental guide.
As a final check, label each checklist item “own,” “buy,” or “rent,” then review the choice against expected future use, storage, and the job schedule. Pahrump Rentals & Hardware connects local DIY customers with tool and equipment rentals, along with hardware and fasteners for project planning. Use your checklist to identify what you need before exploring the rental and hardware options.
Prepare a Pahrump DIY Project Checklist Before Work Begins
A complete checklist covers more than the tools on the workbench. Before starting, account for materials, protective equipment, access to the work area, and cleanup. A safe setup is part of the tool checklist, not an afterthought. For outdoor work around Pahrump, Beaty, Goldfield, or Tonopah, consider current conditions such as heat, wind, and dust when planning work timing and protecting materials. Grouping tools, hardware, and supplies before a trip can also help you avoid preventable interruptions.
Safety gear and work-area setup
Choose protection for the specific task and equipment. Eye, hearing, hand, respiratory, and foot protection may each be relevant, but needs depend on the work. Read the tool’s instructions and applicable safety guidance before operating equipment. Clear the work area, secure materials, and keep bystanders away from active work. If a task exceeds your skills or you can’t use the equipment safely, stop and get qualified help.
Fasteners, supplies, and final checks
Match fasteners to both the materials and the intended connection. Before work begins, inspect batteries, cords, blades, bits, and consumables so worn or missing items don’t catch you off guard. Plan where debris will go, how tools will be stored or returned, and how you’ll inspect the finished work.
Use this printable-style list as a final planning pass. Adapt it to your project rather than treating it as a universal kit:
- Tools: Required hand tools, power tools, accessories, and any rented equipment.
- Materials: Project materials, correctly matched fasteners, and task-specific consumables.
- Safety: Suitable eye, hearing, hand, respiratory, and foot protection; instructions and safety guidance reviewed.
- Access and setup: Clear route to the work area, stable space for equipment, secured materials, and bystanders kept clear.
- Conditions: Outdoor timing considered alongside current weather, heat, wind, and dust.
- Cleanup: Debris handling planned, tools ready for return or storage, and finished work set for inspection.
For a practical DIY project tool list Pahrump residents can use, check off each item before beginning and coordinate supply trips around what the list identifies. Pahrump Rentals & Hardware offers equipment and tool rentals, hardware, and fasteners for local DIY projects. Explore tools and hardware for your project.
Get Your Pahrump DIY Project Moving With the Right Tools
A clear plan turns the work ahead into a manageable sequence: finalize the project scope, complete the checklist, choose which tools to own, buy, or rent, and prepare the work area safely. This final review helps ensure that the equipment suits the task and that supporting supplies are part of the plan. For a DIY project tool list Pahrump homeowners can put to use, keep the project details beside the checklist as you make the final selections.
Turn the checklist into a workable project plan
Group items by project stage so you can gather what’s needed for preparation, the main work, fastening, and cleanup. Then separate equipment from hardware and supplies. Tools and rental equipment belong in one group; materials, fasteners, blades, and other consumables belong in another. That distinction makes it easier to coordinate what you already have with what you need to source.
Review the plan if the material, scope, or work area changes. A change in material can affect the tools and fasteners the job calls for. A revised work area may affect access, setup, or how equipment can be moved into position. Adjusting the list before work begins is more reliable than assuming the original selections still fit.
Find local support for tools and hardware
DIYers in Pahrump, Beaty, Goldfield, and Tonopah can bring equipment rental and hardware needs together in one project plan. Pahrump Rentals & Hardware offers tool and equipment rentals, hardware, and fasteners. Use your checklist to identify the tool categories you need and the supplies that support each stage, then include those needs in your project planning.
With the scope settled, the checklist complete, and safe setup included, you’re ready to take the next step at a pace that suits the project. Plan your next DIY project with Pahrump Rentals & Hardware.
Start Your Next Pahrump Project With a Clear Plan
A reliable DIY project tool list Pahrump homeowners can use starts with the task, materials, and finished result. Organize tools and supplies by project stage, then decide what to own, buy, or rent based on likely future use, storage, and project duration. Include fasteners, consumables, and safety gear, too. A complete plan accounts for the whole job, not just the main tool.
For local DIYers in Pahrump and nearby communities including Beaty, Goldfield, and Tonopah, keeping equipment needs together with hardware and fasteners makes preparation more straightforward. Pahrump Rentals & Hardware is a local independent business serving these communities, with equipment and tool rentals for local projects and hardware and fasteners for residential and commercial use.
Use your checklist to shape the next steps, and revise it if the project scope or work area changes. Plan your next DIY project with Pahrump Rentals & Hardware. With a thoughtful list and the right preparation, you can begin your project with greater confidence.
Frequently Asked Questions
What tools should every DIY homeowner have?
A practical starter kit often includes a tape measure, level, hammer, screwdrivers, utility knife, and adjustable wrench. Add safety gear suited to the tasks you regularly handle. There isn’t one essential set for every home: a homeowner who mostly assembles furniture may need different tools from someone doing routine repairs. Choose reliable tools that fit your work, and build your collection as projects call for them.
How do I make a tool list for a home improvement project?
Start with the project scope, materials, work area, and finished result, then divide the job into preparation, main work, fastening, and cleanup. For each stage, list hand tools, power tools, accessories, consumables, and safety equipment separately. A DIY project tool list Pahrump homeowners can use should reflect the actual task, not a generic kit. Review the list if the materials or work area change, and group needed supplies to coordinate local trips.
Should I rent or buy tools for a one-time DIY project?
For a tool needed only for a limited project, renting may be more practical than buying, especially if the equipment is specialized or bulky and would be difficult to store. Consider how long the job will take, how you’ll transport and set up the tool, and whether you can operate it safely. Buying may fit tools you expect to use regularly on future household projects. Base the decision on likely use beyond today’s task.
Can I rent power tools for a DIY project in Pahrump?
Pahrump Rentals & Hardware provides tool rentals for local projects, serving DIYers in Pahrump and nearby communities such as Beaty, Goldfield, and Tonopah. If your plan calls for power equipment, include the tool, required accessories, and safety needs in your checklist. Follow the equipment’s operating instructions and plan for transport, setup, and safe use before starting work.
What safety gear should I include on a DIY tool checklist?
Choose protection based on the task and equipment. Your checklist may include eye, hearing, hand, respiratory, and foot protection, as appropriate for the work. Read tool instructions and relevant safety guidance before operating equipment, secure materials, clear the work area, and keep bystanders away from active work. If you can’t use the equipment safely or the task is beyond your skills, stop and seek qualified help.
How do I choose the right fasteners for a DIY project?
Match fasteners to the materials being joined and the connection the project requires. Consider what you’re fastening, where the connection will be used, and the project’s instructions. Don’t assume one type or size suits every material. Add the fasteners to your list alongside the tools and consumables for that stage of work. Pahrump Rentals & Hardware offers hardware and fasteners for residential and commercial use.
What should I check before using a rented tool?
Read the operating instructions and applicable safety guidance before use. Inspect the tool and its relevant components, such as the cord, battery, blade, or bit, for visible damage or wear. Make sure the accessories and protective gear fit the task, and understand how to set up and operate the equipment safely. If anything seems damaged or you’re unsure how to use it, don’t proceed until the concern is addressed.


